How to create new character
Import the character assets to the project
We have all the assets stored in a Drive folder that contains the assets for all characters. Within each character's folder, you will find the assets available for import in the Game Ready folder.
- Add the textures (.jpg, .png) to
client/Assets/Textures/Characters/{new_character_name}folder. - Add the model (.fbx) to the
client/Assets/Models/Characters/{new_character_name}folder. - Add the animations to
client/Assets/Animations/{new_character_name}, each animation may come as an animation clip (.anim) file, or inside a model (.fbx). If that is the case, then you must import those files to Unity, and one by one expand the contents, select the animation clip from them, and copy then paste it in the previously created animations folder.- Rename the animations so it is clear which action the animation represents. The image below shows a model with the Ultimate ability animation clip inside ("Take 001").

- Follow the asset naming convention: AN_CharName_Action
- In the image case, that animation would be AN_H4ck_Ulti
- Rename the animations so it is clear which action the animation represents. The image below shows a model with the Ultimate ability animation clip inside ("Take 001").
Use the imported assets
Using the textures
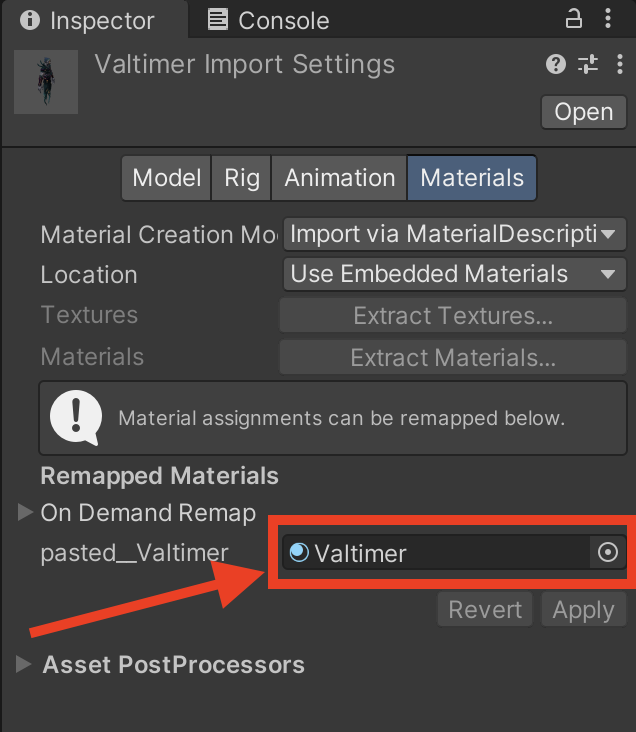
- Create the character materials inside
client/Assets/Materials/Characters/{new_character_name}. - We need one material per desired shader. We currently use 3 shaders per character:
- CharacterGeneric -> (in-game model)
- TransparentCharacter -> (transparent model, like inside bush)
- Universal Render Pipeline/Lit -> (UI model)
- For each material, in the inspector, assign the textures as:
- BaseColor/BaseMap for MainTexture/Base Map
- Normal for NormalTexture/Normal Map
- MaskMap for MetalicTexture/Metalic Map
- Emissive for EmissionTexture/Emission Map
Note that some characters doesn't have metalic and/or emission maps, leave them blank.
Using the models
- Inside the created models folder (
client/Assets/Models/Characters/{new_character_name}), select the model, then in the inspector tab, inside theMaterialssection, set the created material to the field inside.- Note that we created 3 materials, just assign one of them, we will override them later in the prefabs.
- This field may reference the name of the character or have a "txt" or "material" inside it's name, there probably won't be more fields to set, so it should be easy to find (see the image below).
- Maybe you'll have to adjust the
Scale Factorsetting of the model, but don't do that yet, we'll go through this on the character prefab section of this doc.
Using the animations
- Inside
client/Assets/Animations/{new_character_name}set as "loop" animations the ones we need, this is done in the inspector checking theLoopTimecheckbox.- Currently they are: victory, defeat, idle and run/walk.
- In the same folder, create the needed Animator Controller's for the respective character. We usually create two separate controllers, one for UI and another one for in-game actions.
- Name them AC_CharName_UI and AC_CharName.
- Each of these controllers will hold a state representative of each animation the character will make, they are created by drag and dropping the animation clips inside the animator window with the controller selected, then we have to create the transitions between them.
- To create the transitions, you have to right-click any animation then "create transition" and point it to whatever state you want to transition to.

- Every transition must have either
Has Exit Timechecked or a condition added to its list (e.g. victory=true). 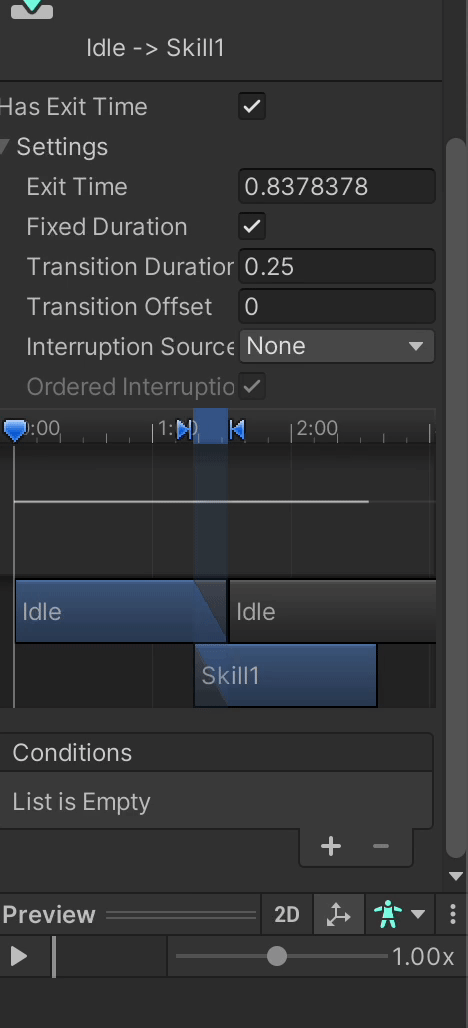
- In general, we set a condition for "in" conditions, that is from state A to state B. For "out" conditions (returning from state B to state A), just set an exit time.
- For most transitions we set the
Transition Durationto 0.2 seconds, but this is just a general rule, for correct implementation each transition must be analyzed separately.
- You also have to create parameters for each controller:
- UI controller:
- Victory (bool)
- Defeat (bool)
- BASIC (bool)
- DASH (bool)
- ULTIMATE (bool)
- in-game controller:
- Walking (bool)
- Skill1 (bool)
- Skill2 (bool)
- Skill3 (bool)
- UI controller:
- Those parameters will be used in the conditions. For example, you want to go from
IdletoBasicSkillwhen bothwalking=falseandskill1=true.- Check other character controllers for reference.
Creating the Character's prefabs
In-game character prefab
-
To create the character's prefab it's best to duplicate one from an already existing character and change the components and references for the new one. They are located in
client/Assets/Prefabs/Characters/. -
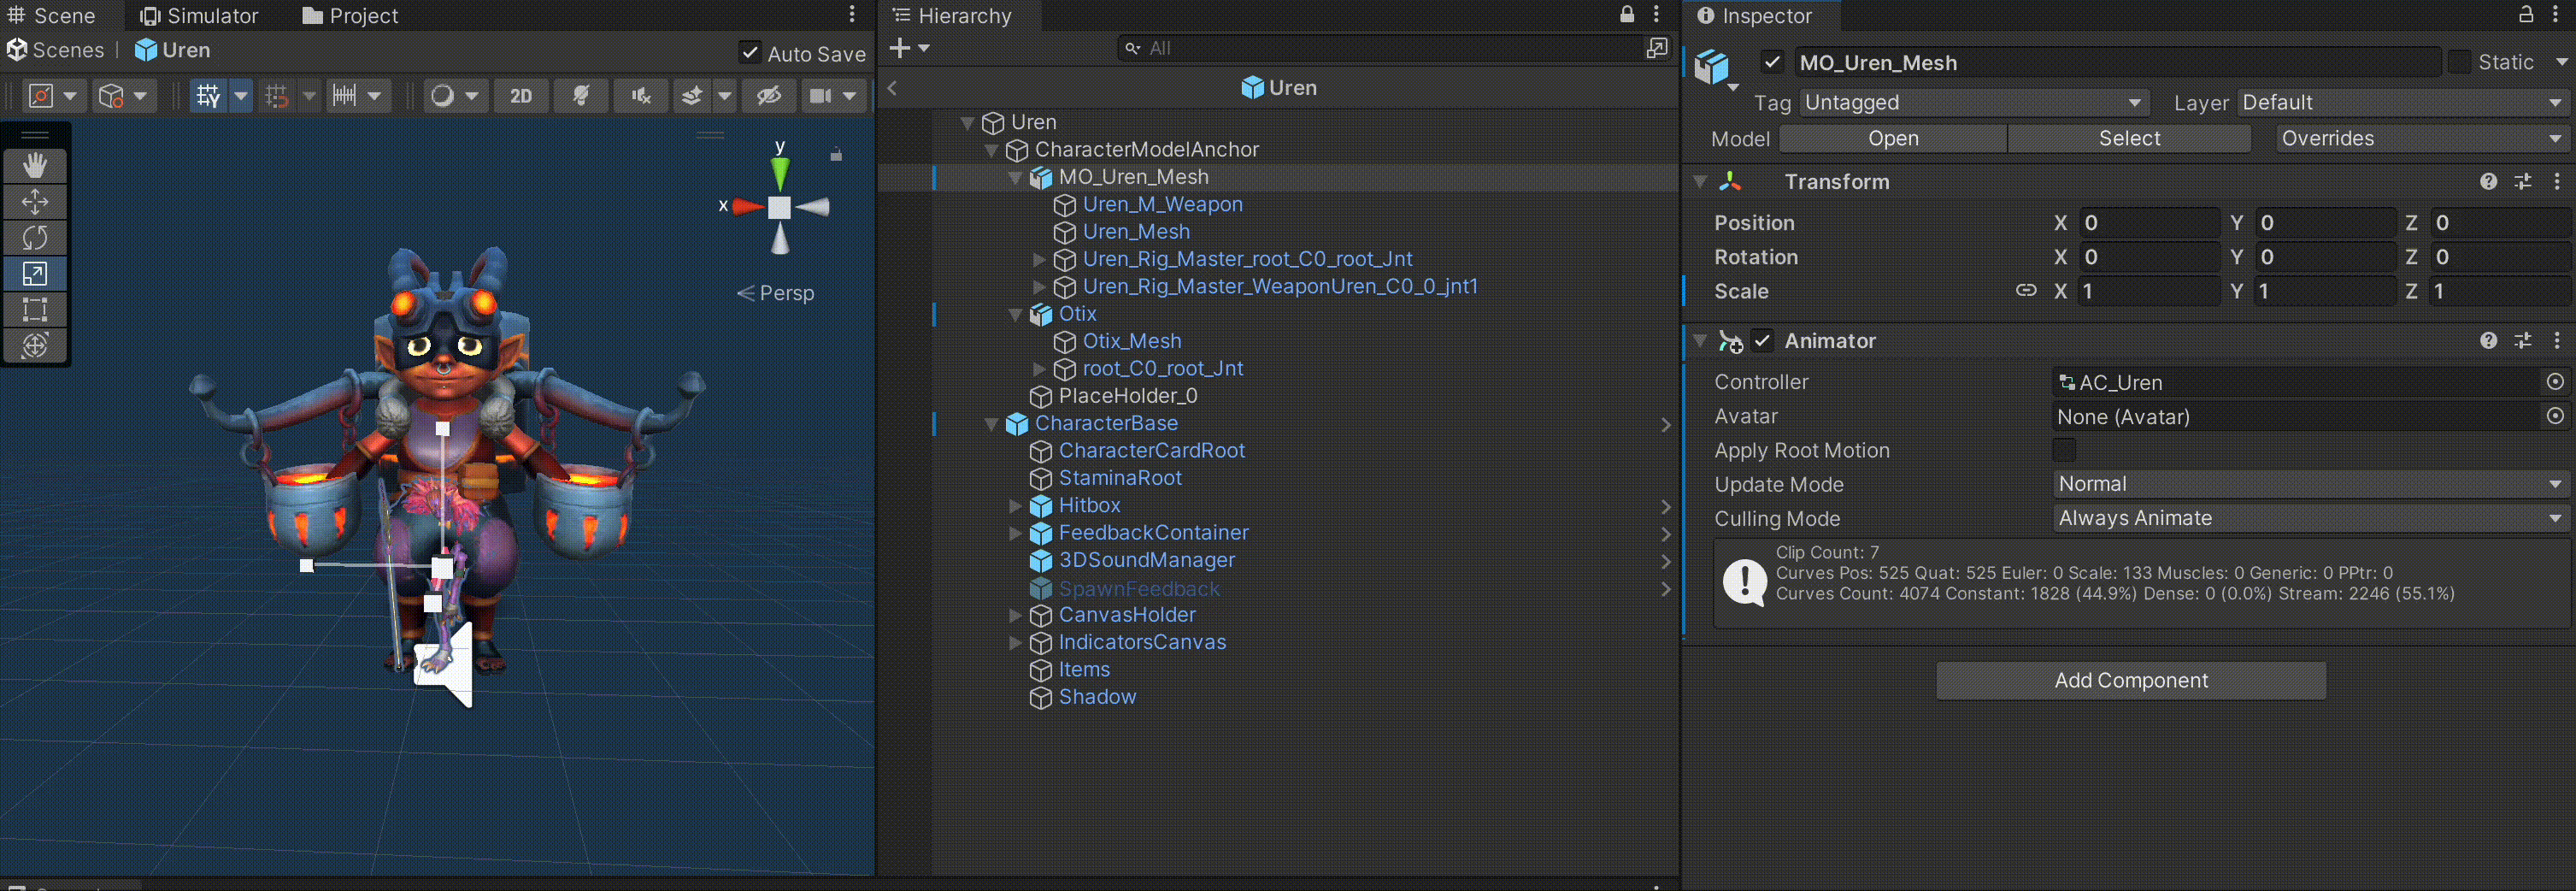
With this prefab opened (hierarchy tab), place the model we imported and tuned before inside
CharacterModelAnchor(be careful some characters are outdated like H4ck and doesn't have this kind of structure). -
Then, with both the model you just added and the one from the copy-pasted model, you can go to "Scene" tab to tune the size of the new model, using the copied model as reference.
- Here you'll have to adjust the
Scale Factorof the model (we talked about this before) and/or theScaleof the transform component of the model inside the prefab. - After both sizes match (doesn't matter if one is shorter and other is taller, both must match), remember to remove the duplicated model from the prefab.
-
Replace the Model's Material if needed (remember we have 3 materials and we have to select the UI or CharacterGeneric one), we must use the CharacterGeneric one here.
-
In the model object of the character's prefab, you must:
- Create an animator component.
- Reference the animator controller we created before.
-
In the prefab's root (not in the model), in the
Custom Characterscript component, under theCharacter Animatorattribute, reference the animator we just created in the model. -
Inside the
CharacterBaseobject of the prefab, you'll have to set theSkinnedMeshRendererof the Character Feedback Manager component to the body mesh of the characters model.- To set them, you have to drag and drop the proper mesh game objects from the model to the
CharacterBaseGO. 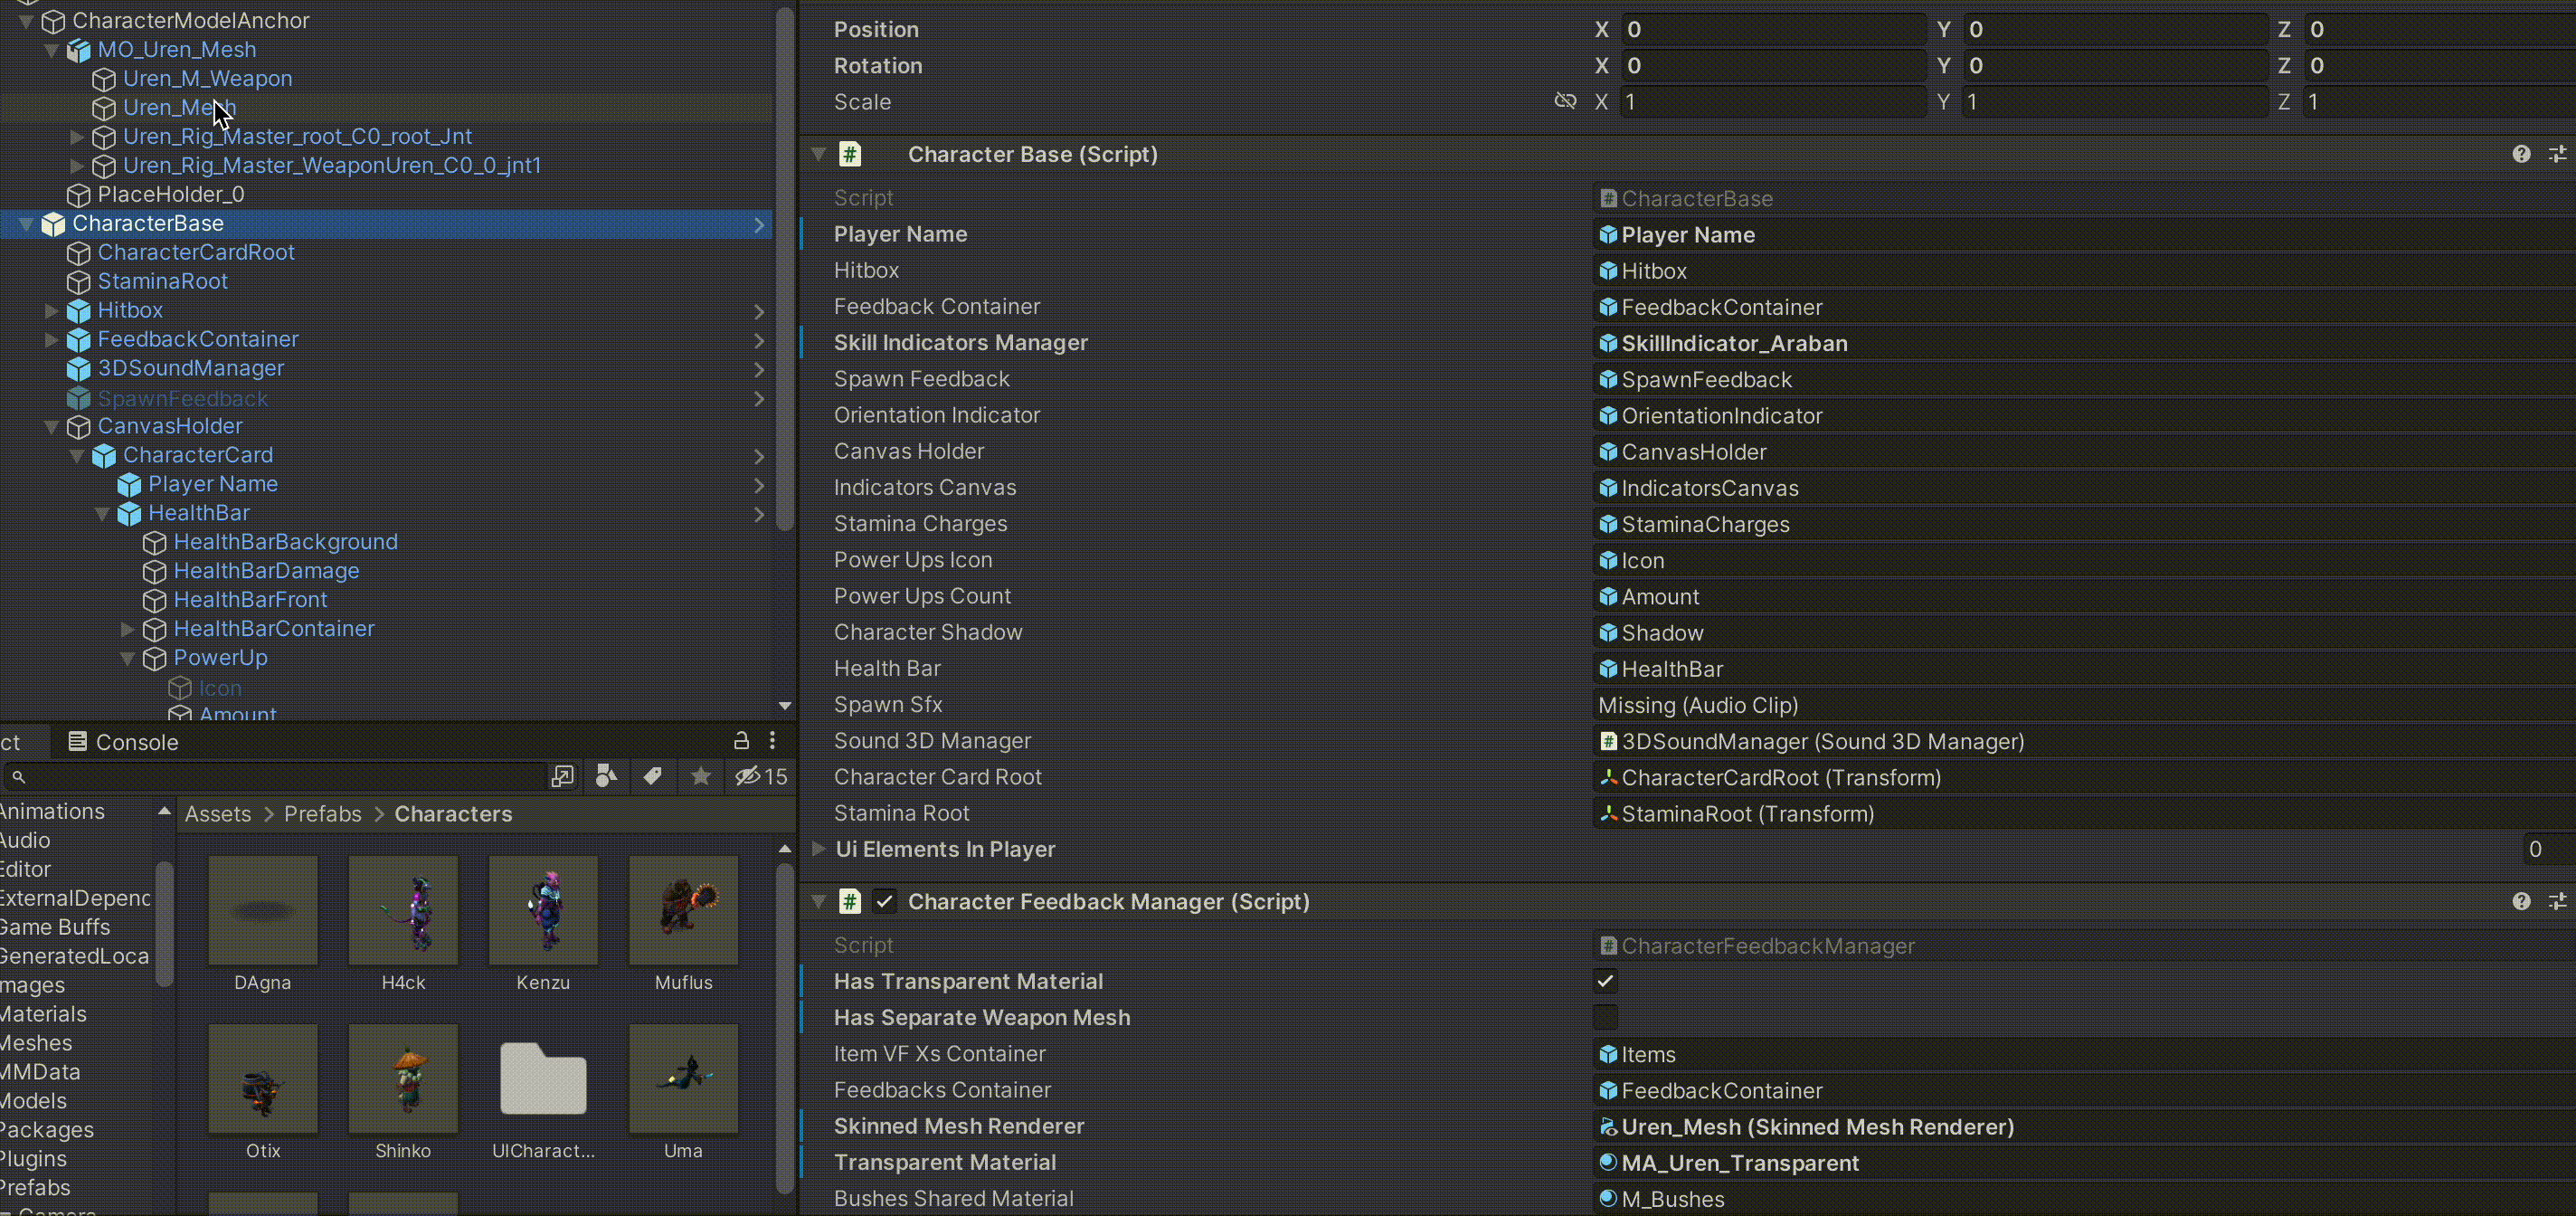
- To set them, you have to drag and drop the proper mesh game objects from the model to the

As you'll probably have seen inside the parent object of the prefab and the CharacterBase object, there are multiple components with many attributes that can be set, you must replace all the references to the previous character with the references to the new character.
Note: some references are not needed for certain characters. For example, some characters have 2 mesh, one for the weapon and another one for the character, set them properly as needed.
UI character prefab
You can:
- copy and paste an existing characterUI
- copy the model from the character prefab you created, paste it inside the characterUI prefab.
- Replace animator controller in model. Use the UI variation instead of the normal one.
- Replace the Material in character and weapon mesh's. Use the UI variation instead of characterGeneric.
Creating character and skills scriptable objects
Inside client/Assets/ScriptableObjects/Characters you'll find the scriptable objects for every character, maybe there is even one for the character you are trying to implement now. If not, create it (Create > CoM Character).
Now you must assign the correct values for the respective fields:
- For the
Skills Infoarray you must create scriptable objects insideclient/Assets/ScriptableObjects/Skills/{new_character_name}(Create > CoM Skill). - Both the skill's and the character's scriptable object itself have many fields that must be set respective to the character's features and characteristics.
After the previous steps are complete you must go to the TitleScreen scene and add the newly implemented character's scriptable object to the All Characters collection inside CharactersManager.
Also, if you want to add the character as a selectable character in game, you have to add its name inside the script CharactersManager.cs code, in the availableCharacterNames list field.
With all this done the only thing left to do is check if the character is available and playable, and the editor doesn't show any warning or error.
Tips
- It's a good idea to lean on already implemented characters when getting stuck, to copy the structure they follow.