Message Protocol
The current message protocol is Protobuf.
You can find the file defining the spec in the root of the project messages.proto
Generating the files from .proto
When using Protobuf the common thing to do is use generators that take you .proto files and generated the code in your language of choice.
Since we have 2 distinct langauages (Elixir, C#) below you will find the sections for each one
Elixir
For Elixir we use the library protobuf
Requirements:
- Protobuf compiler (
protoc), you can check the releases for a pre-built binary or in macOS dobrew install protobuf protoc-gen-elixirplugin forprotoc. Install withmix escript.install hex protobufand make sure to include in yourPATH, if you are using asdf runasdf reshim
Generating code:
After much trial and error, we distilled the code generation into a simple command you can use from the root of the project
make gen-server-protobuf
This will generate 2 files
messages.pb.ex, which is the module specifying the structs (and other things) for our protobuf messagesproto_transform.ex, this module is referenced bymessages.pb.exin thetransform_module/0callback. This module handles the transformation from our data types (structs, maps, etc) into the generated structs of the protobuf messages (and viceversa)
CSharp
For C# we use the library protobuf-net
Requirements:
- Protobuf compiler (
protoc), you can check the releases for a pre-built binary or in macOS dobrew install protobuf - .NET6 runtime needed by
protogen3.2.12 - protogen tool to generate the code, similar to
protoc
Generating code:
After much trial and error, we distilled the code generation into a simple command you can use from the root of the project
make gen-client-protobuf
Game Settings
We have file called game_settings.json which will be used to set up our settings for the game. These settings are basically a key-value pair using a json file. At the moment we're allowing a few things to be configurable, but in the future we can discuss which things could be useful for us and add the needed logic to have it as a custom parameter.
In the beginning we're just supporting options server related, but we will iterate to have more options for the client.
Settings Supported
We're currently supporting the following options:
{
  "board_size": {"width": 1000, "height": 1000}, # The size of the board
  "server_tickrate_ms": 30, # Measured in miliseconds, it represents how often the server is sending the updates to the client
  "game_timeout_ms": 20, # Measured in miliseconds, it represents how much time the game session lasts
}
Adding a new parameter
In case you want to add a new parameter, there a few things to do:
- Add the new parameter in the
game_settings.jsonfile - Go to the
GameSettings.csfile and add the new attribute to theSettingsclass and if its a composed attribute, do something like the board_size attribute - Add the attribute to the
GameConfigstruct inmessages.proto. - Run the
gen-protobufcommand (makefile phony) - Add the needed logic in the server
Fileguides
Characters.json
Overview
This file contains the information and base stats from characters in the game
Data Fields
- Name: defines the internal name for a character
- Id: unique numeric ID to identify the character
- Active: boolean. Defines if the class is currently playable
- Class: character class (war, hun, ass, wiz)
- Faction: their origin (oto, mer, ara, kal)
- BaseSpeed: defines a numeric value for the character's base movement speed
- SkillBasic: lookup field to Skills.json for the character's basic skill
- SkillActive1: lookup field to Skills.json for the character's first active skill
- SkillActive2: lookup field to Skills.json for the character's second active skill
- SkillDash: lookup field to Skills.json for the character's third active skill
- SkillUltimate: lookup field to Skills.json for the character's ultimate skill
- BodySize: f64 that defines the circumference of how much space the character takes up in the board. Useful for knowing when an attack impacts them, for example.
GameSettings.json
Overview
This file contains various settings used by the game
Data Fields
- Name: defines the internal name for a settings group
- board_width: defines the width of the playing board
- board_height: defines the length of the playing board
- server_tickrate_ms: represents how often the server sends updates to the client
- game_timeout_ms: represents how much a game session lasts
- map_shrink_wait_ms: Represents the amount of time players have to wait until the zone starts to shrink
- map_shrink_interval: It's the interval time between shrinks
- map_shrink_minimum_radius: Mininum radius for the playable area, how small can the playable zone can get
- out_of_area_damage: Represents the damage the area does
- spawn_loot_interval_ms: Interval in milliseconds for spawning loot crates
Skills.json
Overview
This file contains information about all the skills in the game. NOTE: whether each field is used or not depends on the function of each skill. So adding damage to a buff does nothing unless the buff is referencing that field.
Data Fields
- Name: defines the internal name for a skill
- Cooldown: determines how long one must wait between uses of a skill
- Damage: determines the damage of a skill as a percent of the character's base damage
- Duration: determines the duration of a skill/buff
- SkillRange: represents the attack's range of an skill
- Par1-5: arbitrary parameters depending on the skill func
- Par1-5Desc: comment fields, describing the above
- Angle represents an angle modifier for the skill
Build Settings
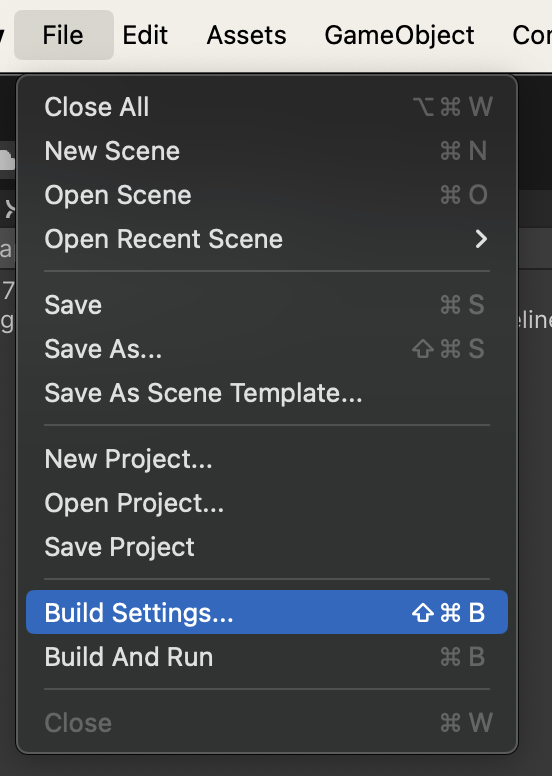
1. Open the Build Settings Window
Locate the Build Settings window as shown below:
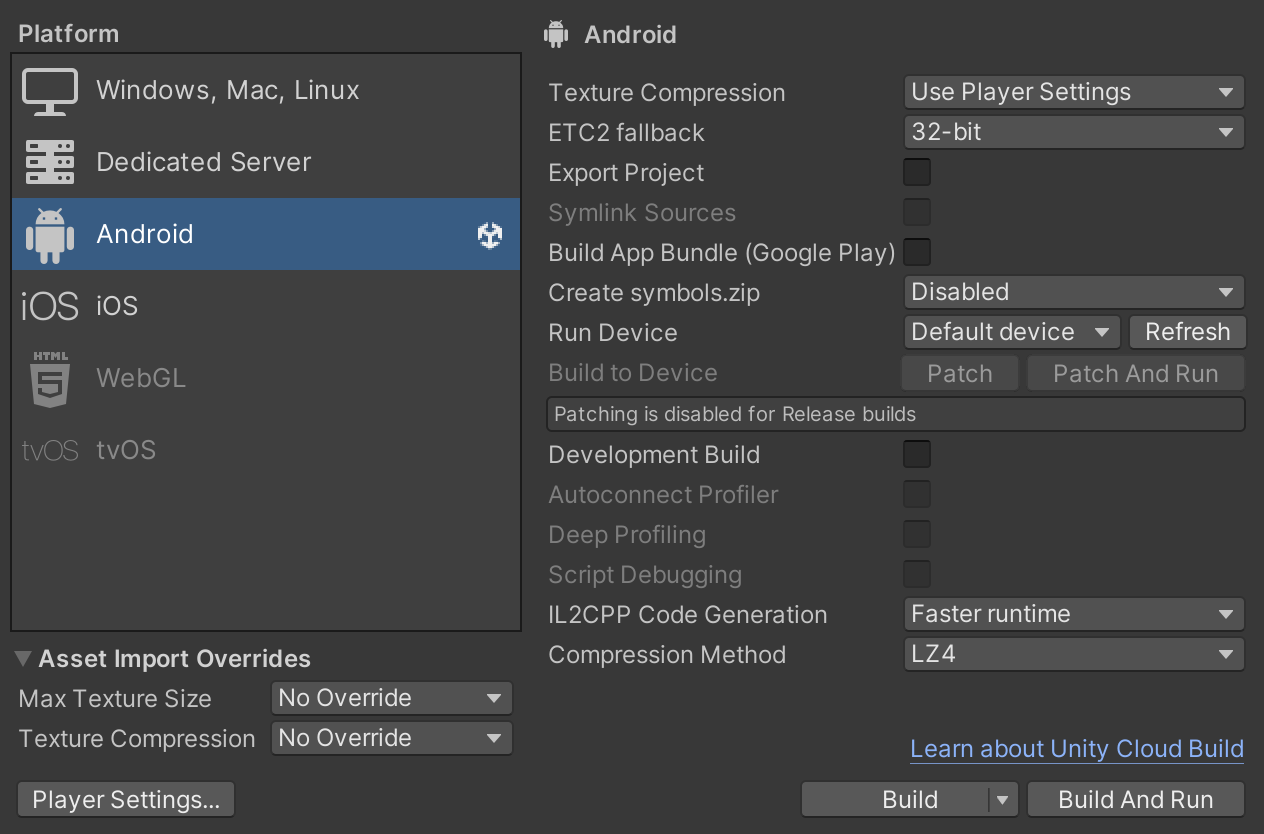
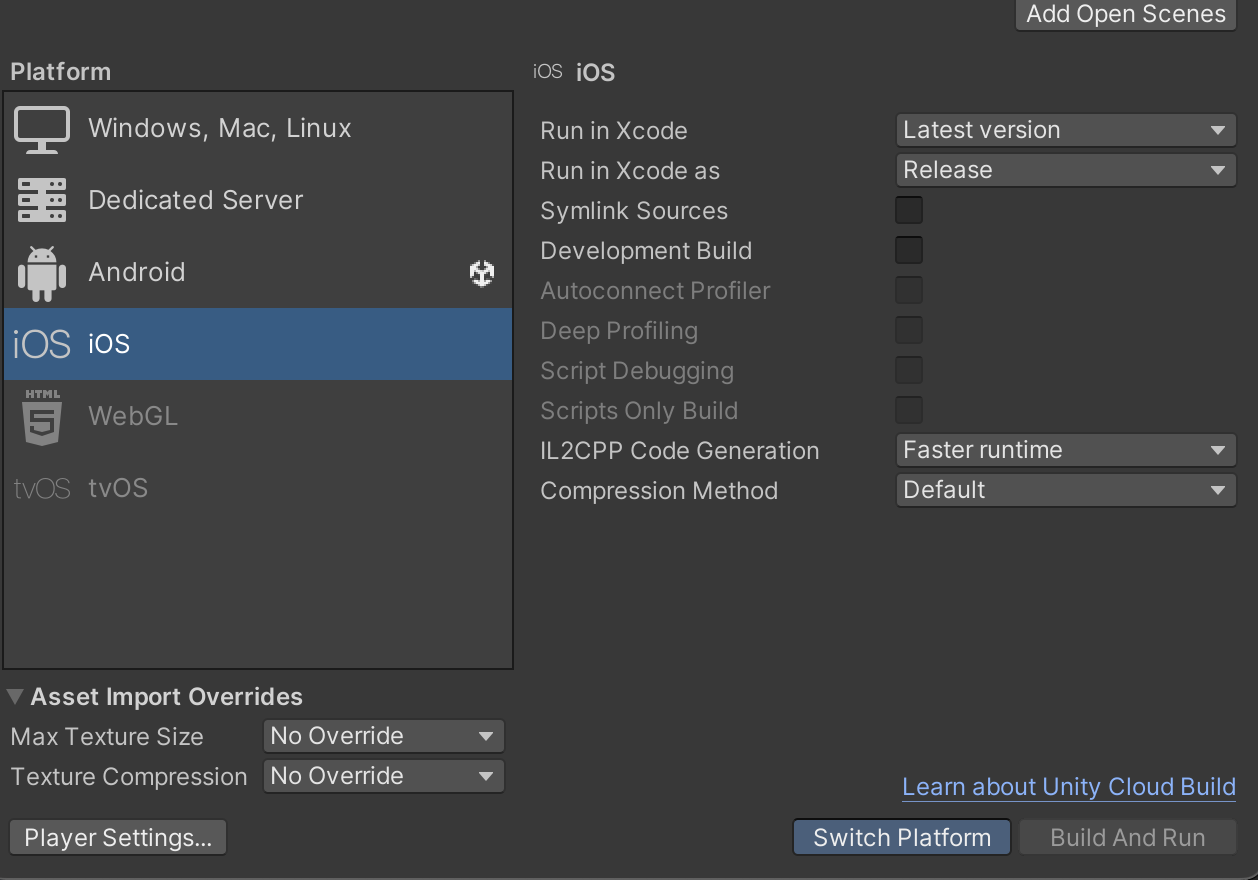
2. Select and Configure Your Target Platform
Choose the platform you are building for (Android or iOS) and click Switch Platform to ensure the settings are applied to your selected platform.
Android Platform:
iOS Platform:
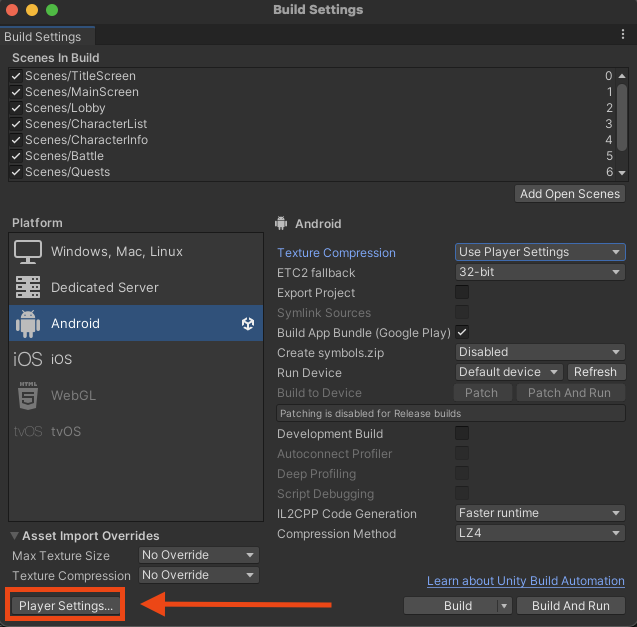
3. Open the Player Settings Window
Click Player Settings located at the bottom left corner of the Build Settings window. This will open the platform-specific settings for your selected platform.
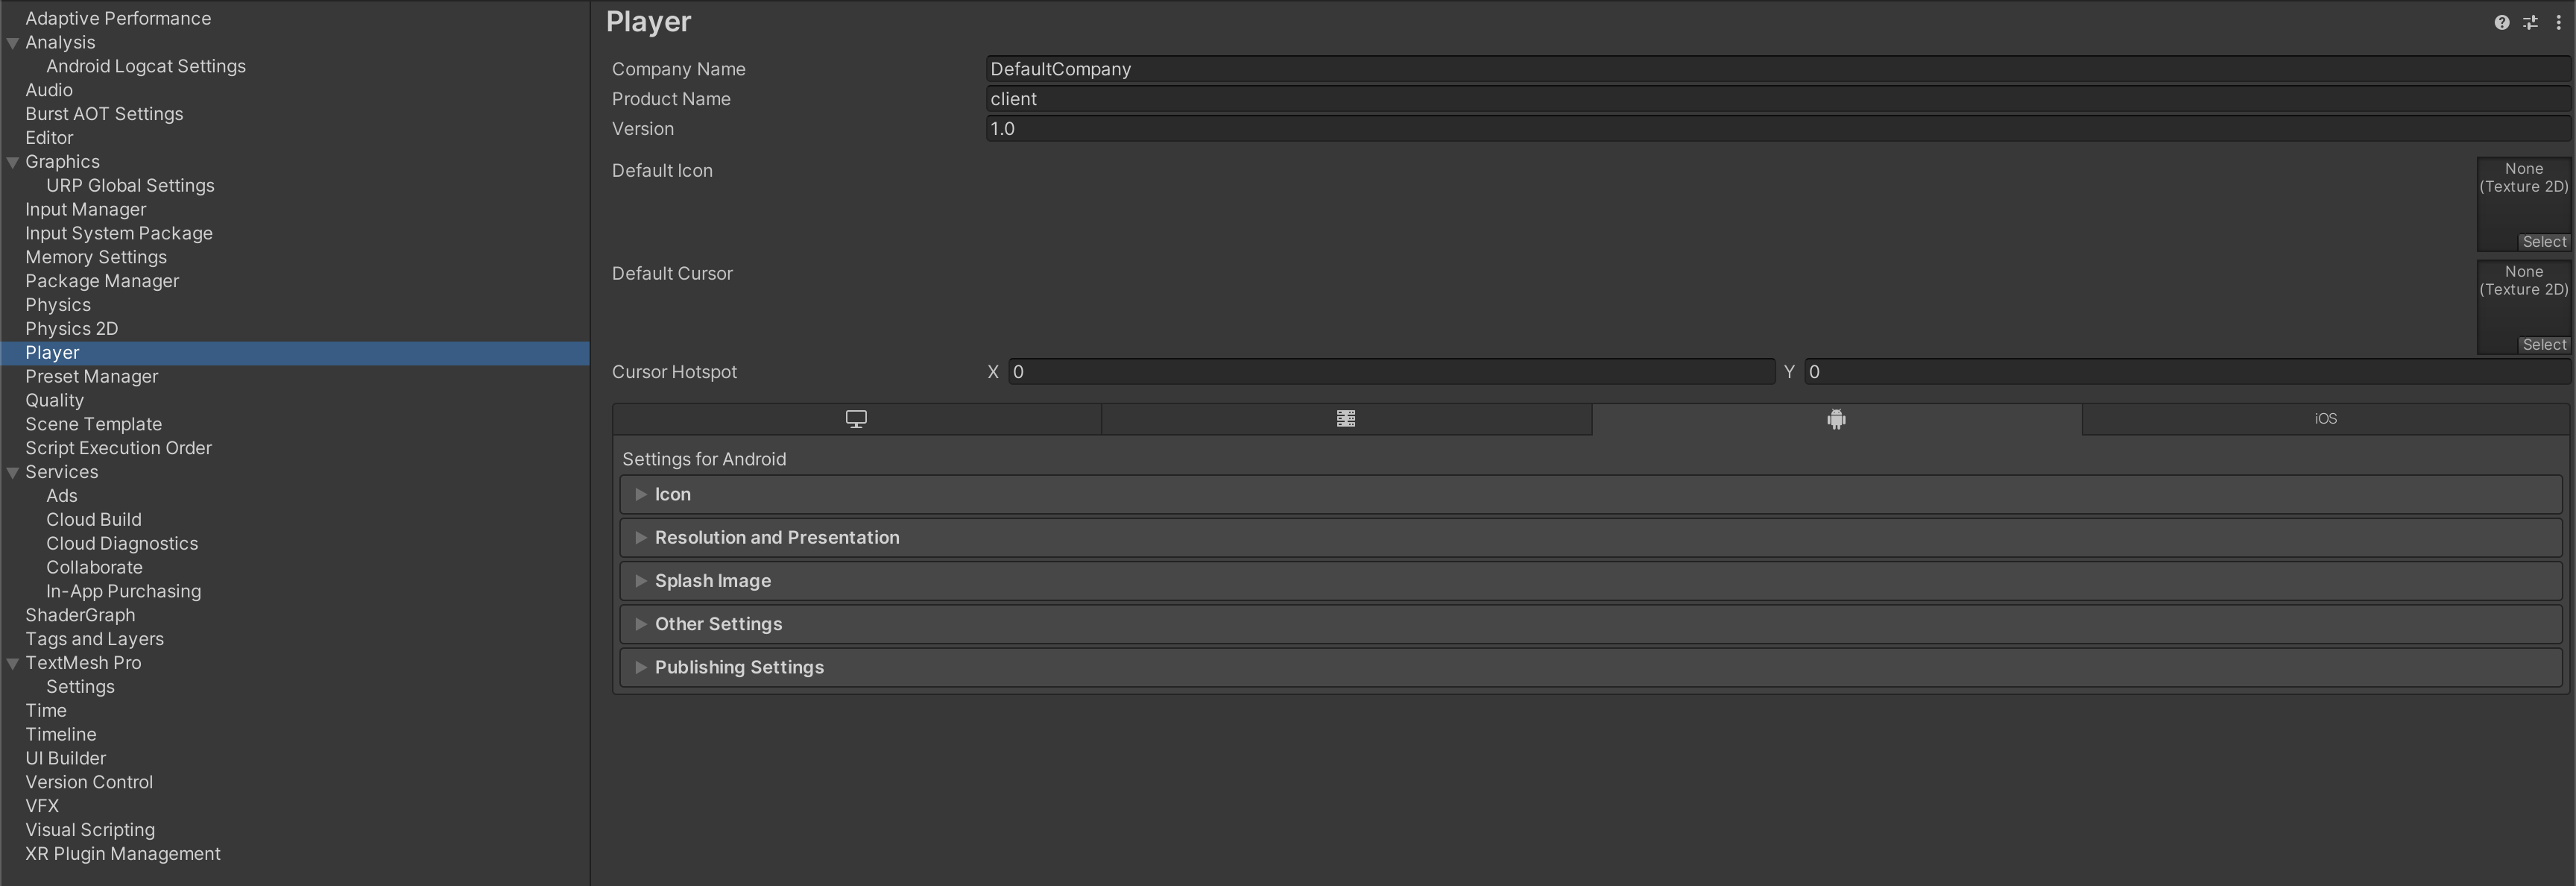
4. Platform-Specific Settings
Each platform has its own set of configuration tabs:
- Windows, Mac, and Linux
- Android
- iOS
4a. Windows, Mac, and Linux
Resolution and Presentation
- Run in Background: Enable this option.
4b. Android Settings
Resolution and Presentation
- Default Orientation: Landscape Left
Other Settings
Rendering:
- Texture Compression Format: ASTC
Identification:
- Minimum API Level: Android 10.0 (API Level 29)
- Target API Level: API Level 34
Configuration:
- Scripting Backend: IL2CPP
- Target Architectures: Include ARM64
Publishing Settings
- Enable Custom Main Gradle Template
- Enable Custom Base Gradle Template
- Enable Custom Properties Template
- Enable Split Application Binary
4c. iOS Settings
Resolution and Presentation
- Default Orientation: Landscape Left
Other Settings
Rendering:
- Texture Compression Format: ASTC
Deprecated (For Now)
Configuration:
-
Supported URL Schemes:
-
Size: 1
-
Element 0:
{REVERSED_CLIENT_ID}You can find the
REVERSED_CLIENT_IDin the.plistfile downloaded from the iOS OAuth credentials.
-
Steps to generate a build for Android and open it in an Android device:
-
Activate developer mode in your Android device. In most devices, you should go to Settings > About phone and tap Build number seven times. Then, go to Settings > Developer options and enable USB debugging. You'll also need to enable Install via USB. If that's not the way to activate developer mode in your device, you can find help in the official docs.
-
Connect your Android device to your computer via USB. Make sure that your computer can detect your device and that you choose the option to transfer files when prompted in your device.
-
Open the project in Unity and go to File > Build Settings.
-
Select Android and click on Switch Platform. You may need to install the Android Build Support module in Unity beforehand and restart your editor.
-
Click on Player Settings and go to Publishing Settings (you may use the search bar to get there), click on Keystore Manager > (Keystore... drop-down menu) > Create New. You may save it anywhere in your computer outside of the project folder, it's just for testing purposes. You'll need to provide a password and a name for the keystore. Then, click on Add Key.
-
In Publishing Settings, click on Browse and select the keystore you just created. Also in the same window, at the bottom, make sure that the Split Application Binary option is disabled.
-
Close the Player Settings window and back in the Build Settings window find the Run Device selection and select your Android device.
-
Enable the Development Build checkbox, click Build and Run and choose a location to save the build (outside of the project directory). This will generate a build and install it in your Android device. A dialog will appear in your device asking you to allow the installation of the app, click on Install.
-
Once the build is installed, you can open it in your device and test it.
Steps to generate a build for iOS and run it in an iPhone:
-
In iPhone, enable developer mode
Settings -> Privacy and Security -> Developer mode -> On. In desktop, open the Unity project and connect your IOS device. Allow popup permissions for file transfer on both your computer and phone if prompted. -
In Unity, go to
File -> Build Settings -> IOS -> Build and Run. -
Select new folder since all inside this will be overwritten. If Xcode doesn't open automatically, open the .xcodeproj file with Xcode.
-
Go to
Unity-iPhone -> Signing and Capabilities. You can also click the error icon in the top bar. Then, click the error message at the left side of the window. This will redirect you to this same tab. You should see the following:
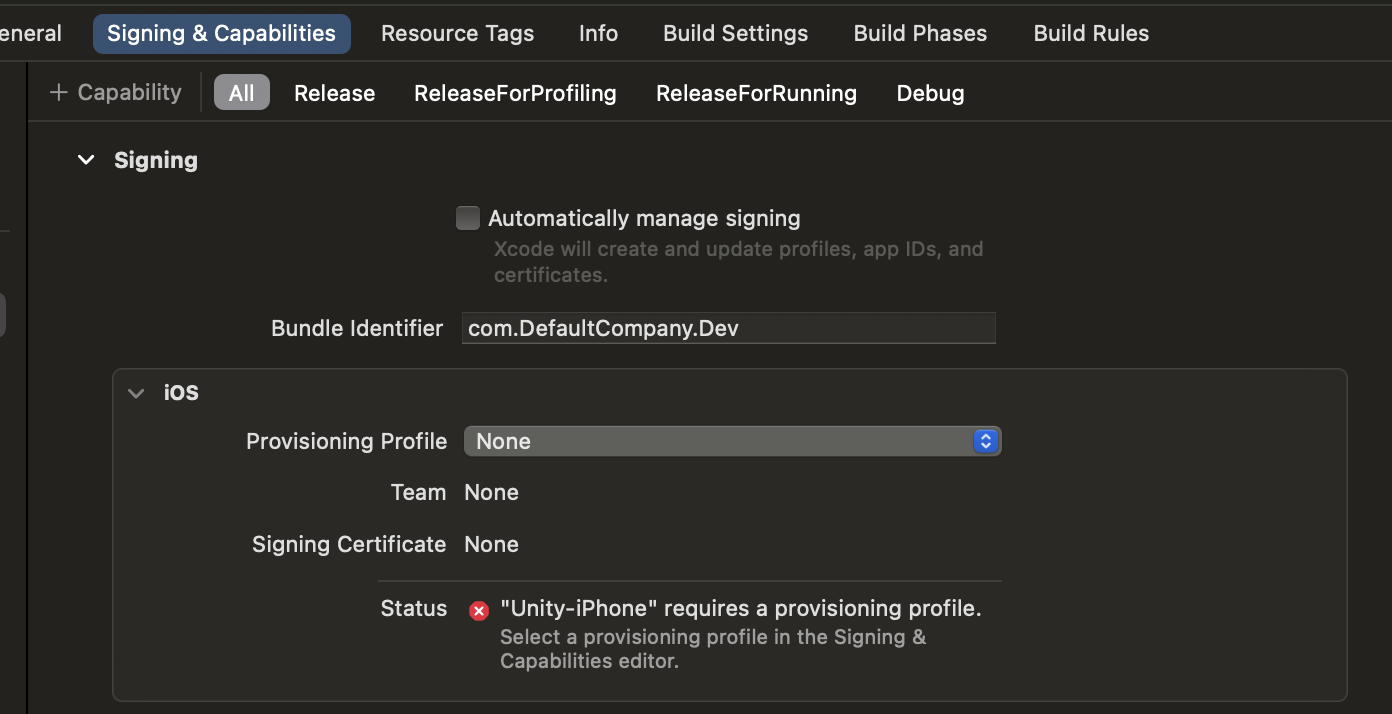
-
Check
Automatically manage signingtoggle. -
In
Teamselector use personal iOS Account (may need free registration in dev program developer.apple.com). Download provisioning profile if needed. -
Change bundle identifier to something unique that we wont use for the game. For example: com.myGitUsername.mirraV and so on. Make sure to press Enter after this so Xcode recognizes the input change
-
In Xcode Choose iPhone in the device selector at the topbar of the window. Here is a visual reference of the selector:

-
Build Game in iPhone by pressing the Play button in XCode's top bar, next to the device selector. (visible in the visual reference from step 8)
-
Once the build is done a warning/error may pop up. This is because you are not yet an trusted developer in the device. To trust developer in iPhone go to
settings -> General -> VPN & Device Management -> Developer app -> Trust.
Fluid Gameplay in an Online Environment
Champions of Mirra is a multiplayer game. As such, every action any player performs (moving, attacking, etc) has to go through a centralized server that changes the state accordingly and sends back the new state to players. This introduces a huge source of problems when trying to render the game smoothly: there is an unreliable network in between.
Here we'll go over the problems that arise from networking, how we solved some of them, and how we might improve these solutions in the future. The way we judge whether we have done a good job or not is if the game feels good to play. Ultimately, that's the only metric that matters here.
The main thing we will discuss is movement, as it is the most basic element of the game that needs to render smoothly. Constant jitters/stutters in movement are the hallmark of code that is not robust enough to handle multiplayer gameplay.
Most of the ideas presented here are not new.
We recommend reading the articles below for an introduction to common problems caused by latency, standard solutions like client prediction and interpolation and examples of implementations, which will aid in understanding our specific implementation.
- Gabriel Gambetta's Series on Client-Server Game Architecture
- Valve's article on Source multiplayer networking
- Valve's article on Latency Compensating methods
Framerate, Tick rate and Action rate
Before continuing, we need to talk about three very important concepts.
Framerate
Framerate, sometimes called FPS (for frames per second), is how many frames the game (Unity) renders each second. Let's go into this in more detail. As complex as games can be, they can all ultimately be reduced to the following high level code:
while true {
    get_user_inputs();
    update_game_state_according_to_these_inputs();
    render_game_state();
}
This mental model is so common in games that it has a name; this is the game loop. A frame is the result of one iteration of this loop. In multiplayer games, such as ours, this loop looks slightly different: clients are not the ones updating game state, they get those updates from the server. The general idea still applies however.
Typically, the more computing power you have, the higher your framerate. In Mirra, we show players their framerate in the bottom of the screen. Its value is usually capped at 300, and anything below 30 will feel really bad to play. Most games run either at 30, 60 or at an uncapped FPS rate.
Mirra does not cap framerate, which means it can go beyond 300 (although you won't be able to see this in Unity, because it doesn't show FPS numbers higher than 300). This is an important thing to keep in mind, as we don't have control over it, and therefore cannot make assumptions about its value. Some games cap it and then use it as a way to, for example, keep track of time.
It's very important to understand that framerate is a property of the client; the server does not know about it at all. This will matter later on.
Tick Rate
The Tick Rate is the rate at which the server sends game updates to every client. As explained on the backend architecture section, the way our backend works is the following:
- It receives commands from clients (move, attack, use ability, etc).
- Commands are applied to the game state, mutating it.
- Every so often, it sends every client the current game state.
This last "every so often" is the tick rate. We usually refer to it in milliseconds, so if we say the tick rate is 50ms, what we are saying is every 50 milliseconds, the backend will send the current state to clients.
You can think of tick rate as the rate at which the client samples the gameplay. A higher tick rate means the client samples more frequently, and thus converge to a more continuous experience, while a lower one can make the game look like a slideshow.
Note that in our design the tick rate is the same for every player, that is, players all receive updates at the same rate. This is not the only way to do things. Valve, for example, makes it possible for the player to set (within a range) how many ticks they get per second. Typically, players want to set it as high as possible for a more accurate experience, but if the network or computer can't handle a high tick rate, lowering it can help.
Action/Command Rate
The Action or Command rate is the rate at which the client sends movement commands to the server. It's important to understand that this applies ONLY to movement. Commands related to using abilities do not have this restriction, and can be sent in any moment, at any frequency. This is an unusual choice. The way we handle input in general is unusual, so let's explain it in more detail.
Usually, the main reason to introduce an action rate is to reduce pressure on the network, both on the server and the client. The standard way to do this is:
- Whenever the player performs a movement or action, it is saved into a list/buffer.
- When the action rate time has passed, the client bundles up all the commands and sends them together to the server.
We don't do this. What we do instead is the following:
- For non-movement commands, whenever the player issues them, we immediately send the command to the server.
- For movement commands, every
ActionRatemilliseconds, we check for input on the movement keys/joystick. We then send the appropriate command to the server (move left, move right, etc).
The reason we do this has nothing to do with reducing pressure on the network. It's a consequence of what movement commands look like in our game. When someone sends a "move right" command, the server will move them a fixed amount to the right. If players were able to send more than one "move right" command in one ActionRate unit, they'd move faster the more they sent. This is a problem, which we fixed in the hackiest way possible. We introduced the action rate to fix the move commands frequency, and thus fix movement speeds.
Keep in mind this isn't final. We may and probably will change this at some point in the future. For now, however, this is how it works. Of course, people could cheat by unlocking their action rate, which is something we will have to address if this is the solution we keep.
The less hacky solution to this is to make move commands tell the server where you are now. Clients know their character speed so they can do the math themselves and just tell the server "now the character is here" or "the character moved this many units to the right". This allows clients to send as many position updates as they want. You still have to prevent cheating, however, by having the server check if the new position is valid under the game rules, but we won't concern ourselves with that here.
In Mirra, the action rate is set to be the same as the tick rate. This way, we get one movement command per tick. The immediate problem caused by this is that game speed is tied to tick rate. Decreasing tick rate slows everything down, increasing it accelerates it. There's also another huge problem this causes, which we'll talk about extensively later on as it affects smooth movement.
Implementation
We found that there were times where the interpolation ghosts [see below: Ghost] differed too way much from the server. After a bit of research, we discovered that the problem had to do with using the Time.deltaTime that belongs to Unity. That amount of time is how much time has passed since the last frame to the current one. That sounds okay, but the problem is that the game editor/Android build/iOS build should be active in the screen, if you change tabs or let the game run in the background the Time.DeltaTime stops but the server doesn't and because of that all the operations get messed up. In order to solve this, we just changed it for Unix time in milliseconds.
    if (firstTimestamp == 0)
    {
        firstTimestamp = DateTimeOffset.UtcNow.ToUnixTimeMilliseconds();
    }
    var currentTimestamp = DateTimeOffset.UtcNow.ToUnixTimeMilliseconds();
    accumulatedTime = (currentTimestamp - firstTimestamp);
And now that we detached the time from Unity, at the moment, everything works as intended.
Networks are unreliable
There are two main problems we are trying to prevent. They are:
- Input lag: Players feel a delay between when they press a button and when the corresponding action happens in-game.
- Choppy movement: Character movement does not look fluid. Sometimes movement stops in-place and then starts again, when it should have been continuous the whole time.
Both of these things are the result of playing over the network:
- The first one happens because every action the player submits has to go the server and then back to the client before it gets applied. This round trip time is what we call the player's
ping. The higher the ping, the higher the input lag. - The second one is the result of network instability. Servers send game updates at a fixed frequency (the
tick rate), but it would be wrong to assume clients get them at that same frequency. Sometimes network packets/frames take longer than expected, sometimes they get lost and have to be retransmitted (we useWebsocket, which usesTCPunderneath). This means clients may not get any update from the server for a little while, only to then get a few of them all at once.
Before going over how we solve these issues, a very important fact needs to be stressed out: networks are unreliable. This is especially important for the second item. Ping can be lowered by having servers close to players, but the network will still be unpredictable.
This problem is inescapable. We won't solve it, we will just find clever ways to hide it from players. Our solutions will involve tradeoffs and will not (and cannot) be perfect.
High ping vs high ping Variance
As we said, input lag is directly correlated with high ping, as ping is the measure of how long it takes for messages (and thus user input) to go from client to server and back. In general, a ping value below 50ms will make input lag barely noticeable, while going above 100ms it becomes apparent. Values over 300ms are borderline unplayable.
We can measure input lag, but how do we measure network instability/packets arriving irregularly? This is not so easy, but a decent proxy to it is ping variance. If your current ping is 100ms and it suddenly jumps to 180ms, then it's likely there was a hiccup in the network. A packet that only an instant before took 100ms to do the round trip to the server suddenly takes an extra 80 milliseconds. Keep in mind this metric is not perfect; we have no idea what's happening to each individual packet or what's happening underneath in the slightest. A million different things could be going wrong to make ping jump like that, some of them not even related to the network itself.
Ping variance is a heuristic. It's not perfect information, but if your ping is constantly jumping around, the network might be acting up. Even under normal network conditions, ping is never flat; there's always some fluctuation. What's important is that it doesn't vary too much.
Let's be more precise about what kind of environment we expect from players:
- Ping should be below
200ms. If it's anything above this, either your connection is not good enough or you are an entire continent away from the server. Both of these things we will not try to solve with code. An ideal ping is around60msor below. - Ping should be somewhat stable, it can't be constantly jumping around by more than
50ms.
Addressing input lag: Client prediction
Input lag was the first issue we tackled, even though in hindsight it's clearly way less important than choppy movement. The way we address it is incredibly simple:
- When users move their joystick or press a movement key, the client sends the command to the server and immediately assumes it was applied by it, thus moving the player.
This is called Client Prediction, because it's the client predicting what the server update is going to look like in the future, once it processes the movement command. Instead of waiting for confirmation, the client immediately applies the update, and input lag disappears.
Notice that, by doing this, we are "lying" to the player. When they move in a direction, they immediately see themselves forward, but that's not where they actually are; the server, which is the source of truth of the gamestate, still needs to process that command and send it out to every player. The higher the ping, the further the gamestate will differ from what the player sees on their screen. This is a tradeoff. The game feels better to play with prediction on, but lie to players too much and they might notice. They may see shots that look like they should miss hit them, because they are not seeing their character where it actually is.
Implementation
Our implementation, located in the ClientPrediction class, works like this:
- We keep a list of movement commands that the player has submitted but the server has not yet applied. In code this is called
pendingPlayerInputs. - On each frame, we start from the current position the server tells us we are, then apply each movement command from our list. This is the
simulatePlayerStatemethod. - Also on each frame, we remove from the
pendingPlayerInputslist the commands that were applied by the server. This is theremoveServerAcknowledgedInputsmethod.
So how do we know which inputs were applied by the server? The client attaches a timestamp to every action they send. When the server sends a new update to a client, it attaches to it the last timestamp they processed from said client. The client can therefore consider all actions before that timestamp as applied. In reality, it doesn't need to be a timestamp. Any ID that's auto-incremented suffices.
Note that, for this to be accurate, the client's movement code has to be exactly the same as the one the backend uses, otherwise prediction will go wrong. Valve solves this by having shared movement code that both the client and the server use. We don't have that luxury, because our backend is in Rust, while the client is in C#. This means we have duplicated code; if the movement logic ever changes on the backend we have to update the client as well to match it.
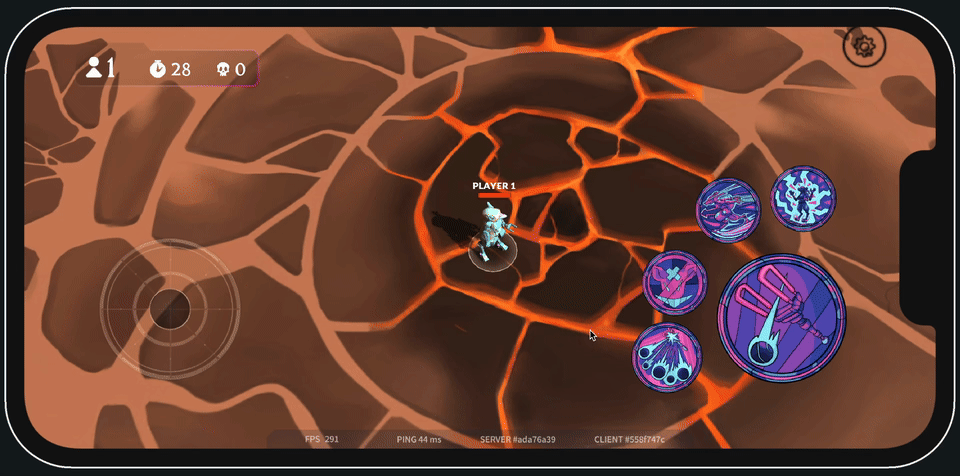
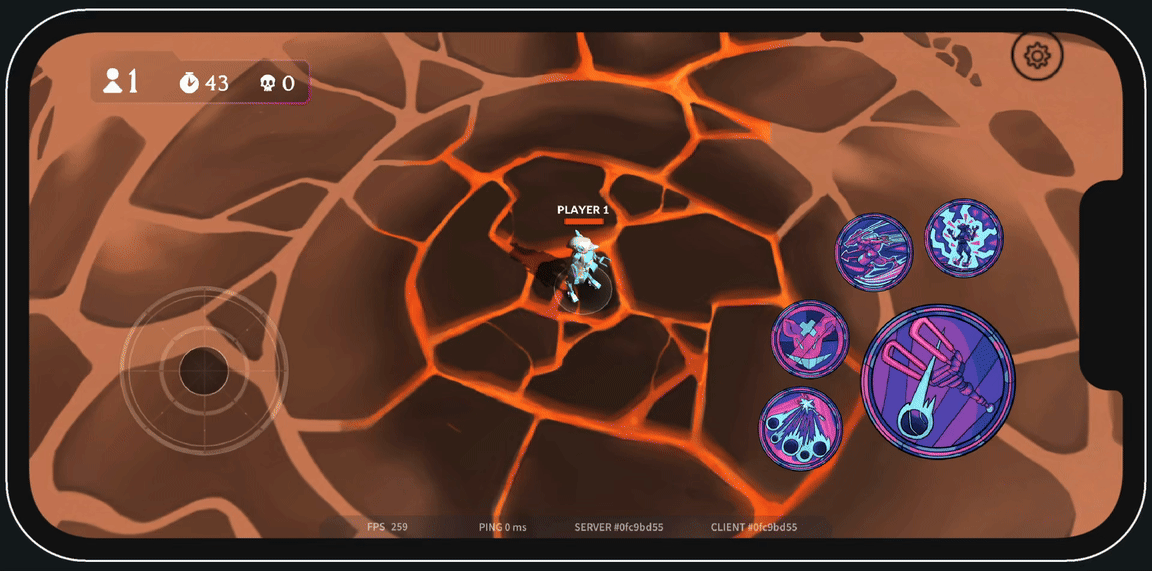
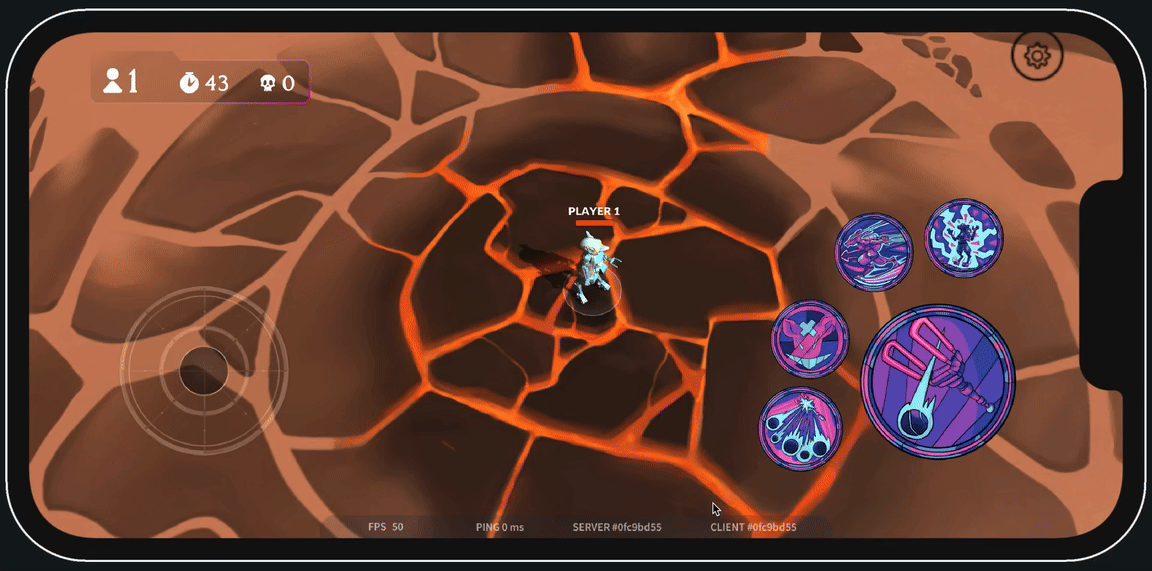
Ghost
To visualize client prediction in-game, we added what we call a player ghost. With client prediction on, the ghost is simply the player's character rendered without client prediction, that is, at the position the server says it is. Below are some examples of prediction at different ping values.
Ghost with 50ms ping
Ghost with 240ms ping
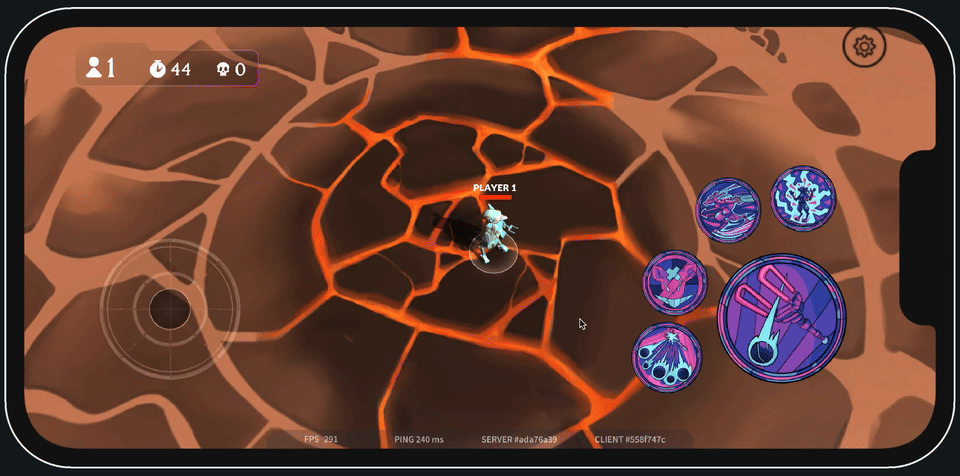
At 240 ping the discrepancy between the ghost and the predicted character is massive. So massive that players will probably notice while playing, when a shot that has no business connecting with them does so. One way to mitigate this is to make characters move slower.
Assumptions
One last important thing: even though it's called client prediction, the client isn't predicting anything. Predictions can go wrong, this can't; we are actively relying on the server always applying our commands. If, for some reason, that does not happen, the client gets desynced from the server. This is important. At some point we considered making the server only apply one movement command per tick, discarding the rest. Had we done that, client prediction would have broken, because the client would've had no way of knowing which commands were going to be applied and which ones weren't.
Choppy Movement: Naive implementation
We now turn our attention to the second (and most important) issue we are trying to solve. Let's first talk about how player movement can be implemented in general.
Recall that, our game being online, each player's position is updated and given to us by the server every tick_rate milliseconds. The easiest way to implement player movement, then, is to do the following:
- On each frame, take the last game state we have from the server, then set each player's position to be the position that's on said state.
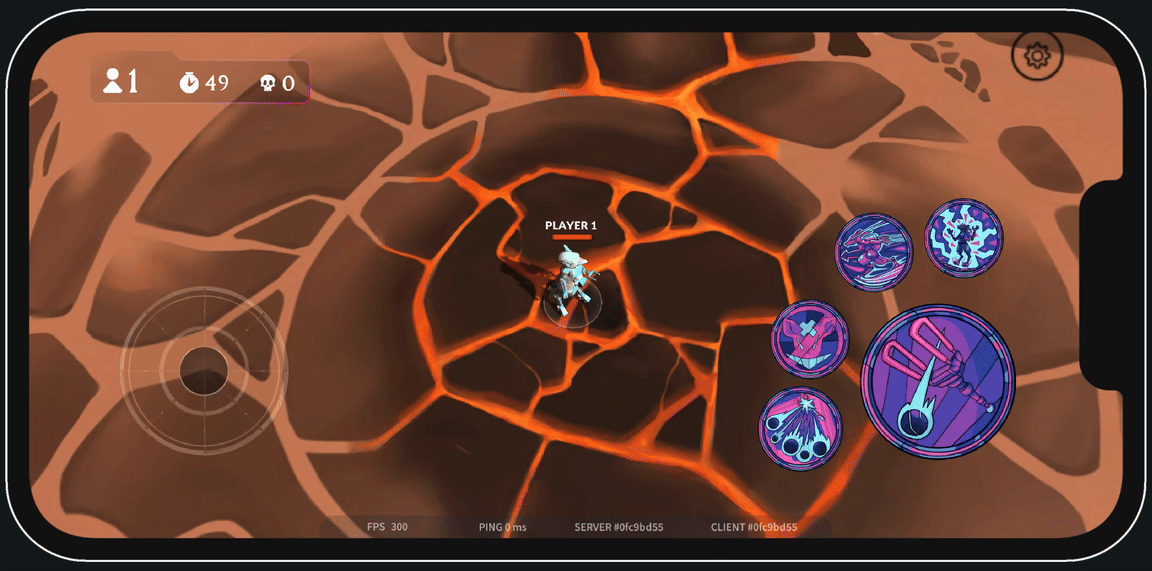
If the tick rate is low enough, these jumps in position should not be noticeable and movement should look smooth. This makes sense, but when implemented, it looks like this:
The character looks super jittery. This is unacceptable.
Notice that my ping is 0 ms. I'm playing on a local server, there is no real network in between. This is not a networking issue, but rather a subtler problem. What you are seeing here is the interplay between framerate and tick rate. In the video, my framerate is close to 300 FPS, while tick rate is 20 ms. This means that, per second, unity renders 300 frames but only 50 ticks happen on the backend.
Because of this, there are roughly 6 frames being rendered per tick ($300 / 50$). On some of them, a new game state from the server arrives, and the player is moved from where they were before to a new position. On most of them, however, nothing changes, as no new update from the server arrives. This difference between frames where position does not change and frames where it does creates the jitter.
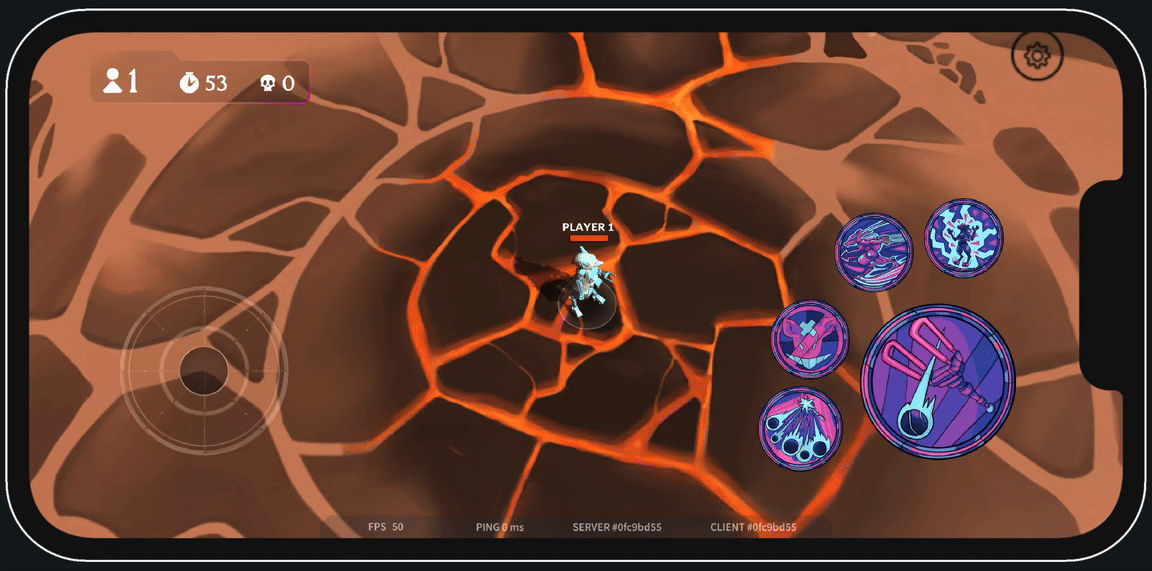
We can test this. If the above is correct, then setting framerate to coincide with tick rate should make it look smooth, because now position changes on every frame. This is what movement looks like with framerate capped at 50 FPS and tick rate at 20 ms (i.e. 50 ticks per second):
As expected, movement now looks fluid. This is not an ideal solution, however, because we said at the beginning that we would not cap framerate. Even if we did, if we ever change tick rates on our backend we would have to change the framerate cap to a new one. Also, framerate is not flat, even when capped. A slight dip in framerate from 50 to 49 could immediately make movement look jittery again. This is not just conjecture, if you play around like this for a while you will see it happen.
Less Naive implementation: Animation Interpolation
Our naive implementation is not good enough. On the server side, characters move discretely (like pieces on a chessboard), on the frontend we need to show characters continuously on every frame in between server updates. Characters have to be moved on each frame proportionally to how much time has passed, so if there's six frames per tick they should go from their previous position to their current one smoothly along those six frames.
More precisely, what we do to fix the jitter is the following:
- On each frame, we take the latest position the server tells us we should be at.
- We then calculate how much time has passed since the last frame (in Unity this is
Time.deltaTime) and move towards that latest position at our character's velocity for that amount of time. In code this looks something like this:
whereVector3 newPosition = players_current_position + movementDirection * velocity * Time.deltaTime;movementDirectionis the vector of length1pointing towards the position the server tells us we should be at.
In other words, what we are doing is making every character chase the server's latest position at their corresponding speed, showing movement gradually over the course of however many frames happen between each tick. When we get a new updated position from the server, instead of immediately placing them there, we move characters smoothly from where they are up to where they need to be. This process of taking two discrete points and smoothing out the movement between them is sometimes called interpolation, linear interpolation or lerp for short.
Note that, as with client prediction, this is a lie. In our backend, the command "move right" will immediately place you n units to the right; you do not smoothly travel that distance. On the client, however, if your framerate is higher than the tick rate (which it will almost always be, as our default tick rate is 30 ms), the game will show that movement happen more continuously, as if you actually pass through the segment in between. This lie is pretty much unnoticeable though; both the time and space windows are very small.
Interpolation makes jitter disappear without having to mess with framerate; things will look fluid whether you run at 50 or 300 FPS. Here are the same two scenarios as before but with interpolated movement:
300 FPS
50 FPS
Now they both look good.
Assumptions/Possible issues
For the above to work well, the client needs to know each character's speed. If the speed used by unity to interpolate movement differs from the one the backend uses, things will go wrong. Every time we get a new position update, we have to travel at just the right speed so that we arrive at that new position just in time for the next server update.
If we go too fast, we will stop in our tracks for a little while, waiting for the next position update to arrive. If we go too slow, we won't have reached our desired position by the time the next update arrives. This will make us lag behind the server, falling further and further behind as time goes on. The result of this last scenario is sliding; players will notice their character still moving for a while after releasing the joystick, as it catches up with the server.
To avoid both these things, the speed used by the client needs to exactly match the one used by the server.
Entity interpolation
We have made movement look smooth when playing over localhost. When moving to actual remote servers, however, our code so far is still not robust enough. There's still one thing to do, and that is Entity Interpolation.
For this topic, let's set up our scenario:
- We have two players in the game (Player 1 and 2)
Our movement feels pretty smooth now, but what about Player 2?. His movement only updates every time we receive an update from the server and, supposing we receive an update every 20ms, we are receiving 50 game updates per second.
Now, let's see Player 2's movement:
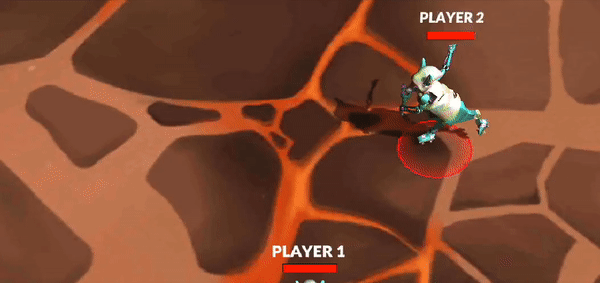
As you can see, Player 2's movement sometimes suddenly stops and that's not because Player 2 decided to stop, it is because we're updating their movement in real time each time we receive an update from the server. So an increase in ping variance can cause a halt in movement, because the next tick takes too long to arrive. How can we solve this? Well, here's where entity interpolation comes to the battleground.
The theory behind entity interpolation is that we save the events returned by our server, and render movements that are few ticks behind, so that we are guaranteed to always have the next tick info available when the current tick passes. We do this only for the characters not controlled by the client. Let's suppose we're interpolating 100ms in the past, a player's movement would look like this:
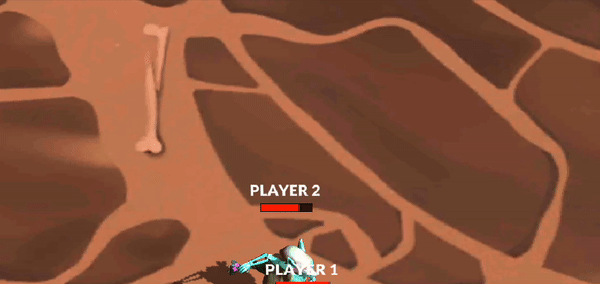
Looks smoother now, doesn't it? Well, let's increase that entity interpolation time and turn on the server's ghost, this will allow us to see what exactly entity Interpolation is doing.
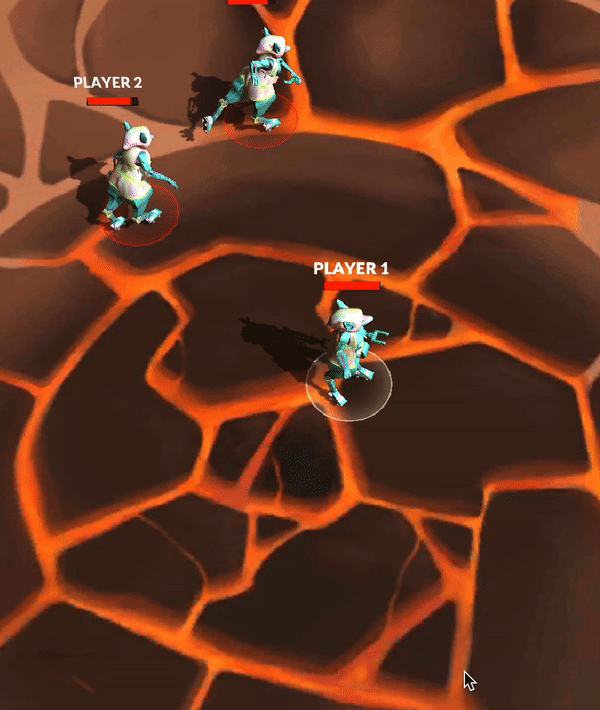
The Player 2 that's behind is the one you're really seeing when you're playing, and the one that's in front is showing the latest update you received from the server. As we can see, this looks choppy and sometimes jitters.
Our implementation
Entity interpolation is a standard solution across the industry, but our implementation is a bit particular due to the way we solved the action rate problem (see the Command Rate section).
The server gets all movement inputs, but in sending them to the client there's not always a consistency of 1 command per tick. Sometimes a tick sends 0 commands and the next one sends 2. To solve this, the client looks for movement in chunks of three consecutive ticks:
- We keep track of the time that has passed since the first update.
- We store the last 20 updates sent by the server.
- We interpolate the movement of other players by checking what they did in a previous update, what they're doing in the current update and what he will do in the next update.
All of this code is in the EventsBuffer.cs, where you can change the delta interpolation time as you please. Remember, the delta interpolation time is how much time in the past you will render, if it's too high, you'll be lying too much to your players.
Common Pitfalls
Floating point arithmetic
Keeping track of time in Unity
Some parts of the client code need to keep track of how much time has passed since the game started. Most notably, entity interpolation uses this to know which game update from the buffer it should render. There are at least two ways to do this:
- Using the
Timemodule provided by unity, with functions likeTime.deltaTime, which gives you the time passed between frames. - Using Unix timestamps, keeping an initial timestamp at the beginning and then getting a new one each time we want to know how much time has passed.
It might seem like these are equivalent, but the first one has a problem that the second one doesn't. The problem with using Time is that it needs to have the game running for it to apply. If you ever move the game to the background, it will stop running, frames won't be executed, and the time will essentially stop passing. If you alt-tab for one second, when you go back to the game your accumulated time is one second behind.
This is a huge problem. A possible solution is to change the settings on Unity so that the game always runs, even in the background. This does not work, however, because not every platform allows for running in the background (Android, for example, forbids it).
Because of all this, if you have to keep track of accumulated time, go for timestamps, not Time.
Unity Animations
Quick overview
The animator
The animator is the interface to control the Animation System Overview. We use it to add the animations and create a flow within them.
Animation
The animation component is used to play animation clips, which are movement keyframes of the object we want to animate.
Transitions
Animation transitions allow the state machine to switch or blend from one animation state to another. We can use different parameters to make a transition happen. Such as booleans, floats, etc.
Transitions have different settings to setup depending on what you want, these are the most important.
- Has Exit Time: Determines a fixed time for an animation. Ignores any kind of transition parameter.
- If the Fixed Duration box is checked, the transition time is interpreted in seconds. If the Fixed Duration box is not checked, the transition time is interpreted as a fraction of the normalized time of the source state.
- Transition duration: This determines how much will it take to transition to the next state.
We need the Animator, animations, and transitions to create solid animations with correct flow and states. Drag the animations inside the animator and create a transition (right-click in the state) between them to start using your animations.
How we handle animations
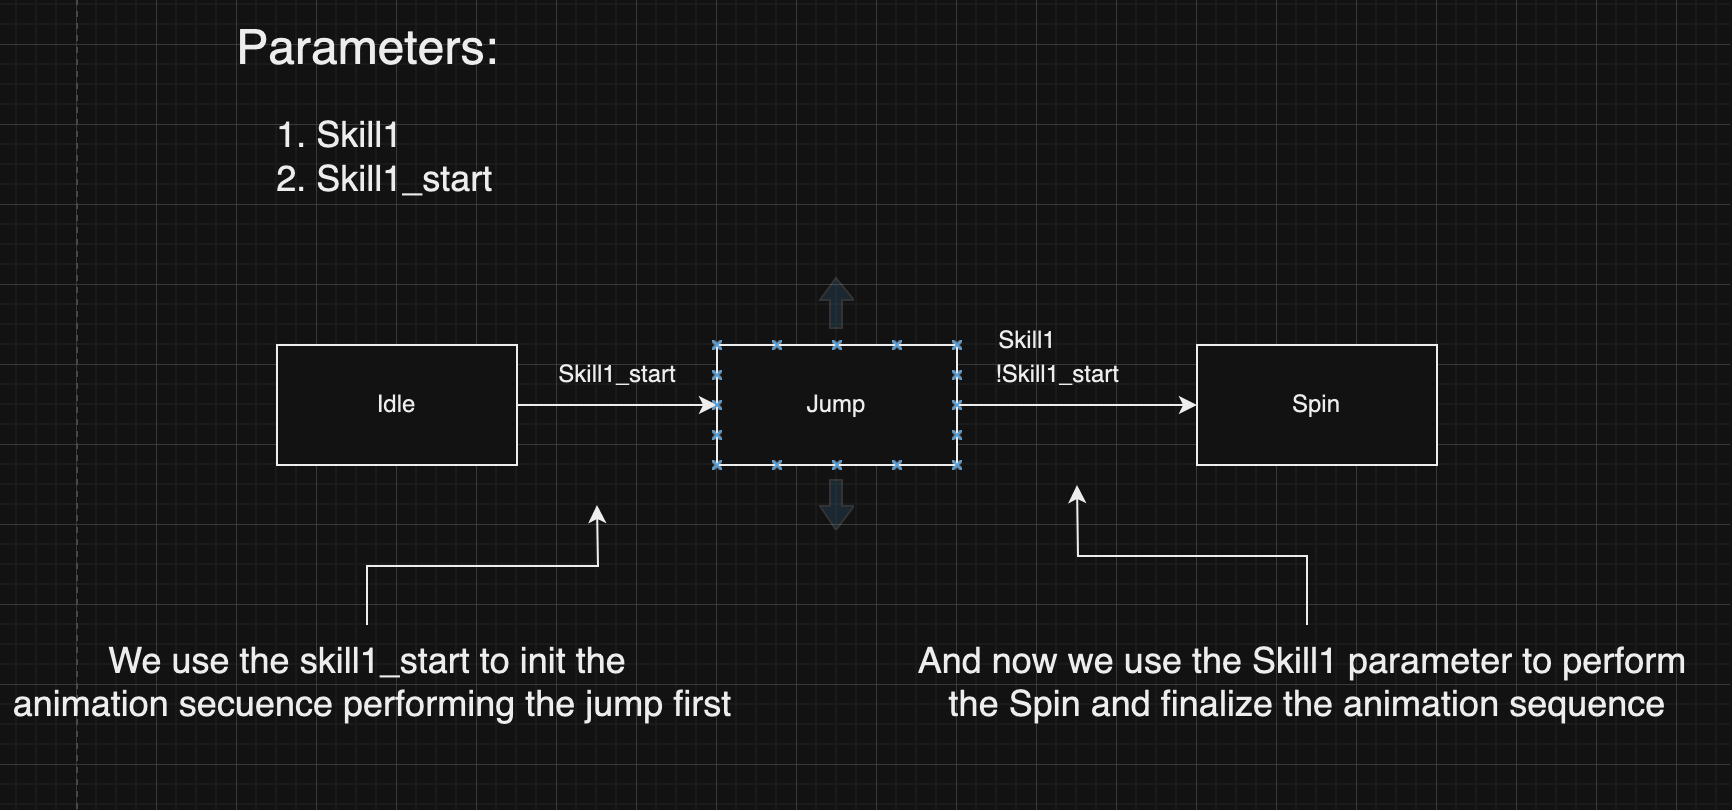
Parameters
We use a specific list of parameters for our transitions
-
SkillBasic, Skill1, Skill2, Skill3, Skill4 (Booleans)We use them to change the state of the animation and make the transition happen. -
SkillBasic_start, Skill1c_start, Skill2c_start, Skill3c_start, Skill4c_start (Booleans)Not always necessary, we use them to concatenate animations. For example, if a skill has two different animations that happen sequentially and we want to concatenate them to create the whole animation we can do something like this:
-
SkillBasicSpeed, Skill1Speed, Skill2Speed, Skill3Speed, Skill4Speed (Floats)We use them to control the speed of the animation. To use them you have to set the animation to use the multiplier parameter and choose the respective parameter. -
SkillBasicSpeed_start, Skill1Speed_start, Skill2Speed_start, Skill3Speed_start, Skill4Speed_start (Floats)We use them to control the speed of the animation start. To use them you have to set the animation to use the multiplier parameter and choose the respective parameter.
Scripts
Let's dive into how we use the animations to match with our backend, the scripts we use and more. The main scripts that participate in the animation flow are:
-
Skillinfo.csa ScriptableObject with the skill information, here what we care about are the fieldshasModelAnimation,startAnimationDuration,executeAnimationDuration, andanimationSpeedMultiplierfields. We'll talk about them later, so keep them in mind. -
Skill.csThis is a really important script, here we control the complete flow of the animations (Play, Stop, Block movements, etc) -
SkillAnimationEvents.csis in charge of changing the active skill playing and end the animation playing. -
Battle.csDepending on the backend action, executes the corresponding skill and starts the flow of the animation system. -
CustomLevelManager.csWhere the buttons are mapped with the respective skill.
SkillInfo fields
-
startAnimationDuration: (float) andexecuteAnimationDuration: (float) These methods represent the maximum duration time to eject the skill animation -
animationSpeedMultiplier: (float) Determine the play speed of the animation (used in the transition parameters if it is set).
Skill.cs
In this script is where all the skill-animation flows happen. It has all the scripts to start, execute, stop, and change the animations. Check the documentation to read more: Skill docs.
Skill.cs Animations
Let's start by explaining the different methods we have in this script, since it handles more things than just animations, let's focus only in the methods and flow of the animations.
SetSkill
It is used to initialize the skills once the character is selected, it maps the skill from the backend, the skill ScriptableObject and the animationEvent.
ClearAnimator
This method clears each skill parameter, setting all booleans to false.
ChangeCharacterState
Updates the current playing animation, changes the movement state machine to attacking and sets the respective animation parameter to true.
StartFeedback
This is in charge of beginning the start animations (parameters with "_start" in their name, ex: "Skill1_start"), calls the methods mentioned before ClearAnimator and ChangeCharacterState and finally starts a coroutine to end the animation depending of the startAnimationDuration time of the skill ScriptableObject.
ExecuteFeedback
This method is very important because it controls all the flow of the Skill animations.
This method implements the same logic as StartFeedback but for the parameters of all the skills without the "_start" in their name (ex: Skill1). It also uses executeAnimationDuration instead of startAnimationDuration to end the animation.
EndSkillFeedback
Changes the movement machine state to Idle and sets the animation parameter to false. This is used in the SkillAnimationEvents to end the animations.
ExecuteFeedback flowchart

This flowchart only takes into account the animation part of the method
How to Map the animations to a new character
To add the animations and adjust them to your character, it's simple:
First of all, if your animations are inside a model (character model) copy them and create a new folder for your respective character inside of the Assets/Animations folder.
When you have all your animations in the folder, check one by one if they had the field loop time checked or not. This depends on whether you want the animation to be looped or not. A good example of loop animations are Walking and Idle.
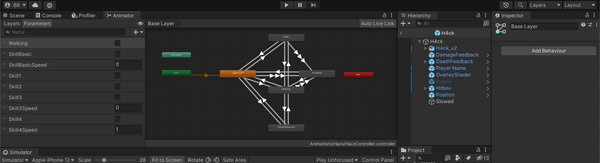
Now make sure you have an AnimatorController for your character, if not, create one through Unity's top bar:
Assets > Create > AnimatorController renamed and move it to the Assets/Animations folder.
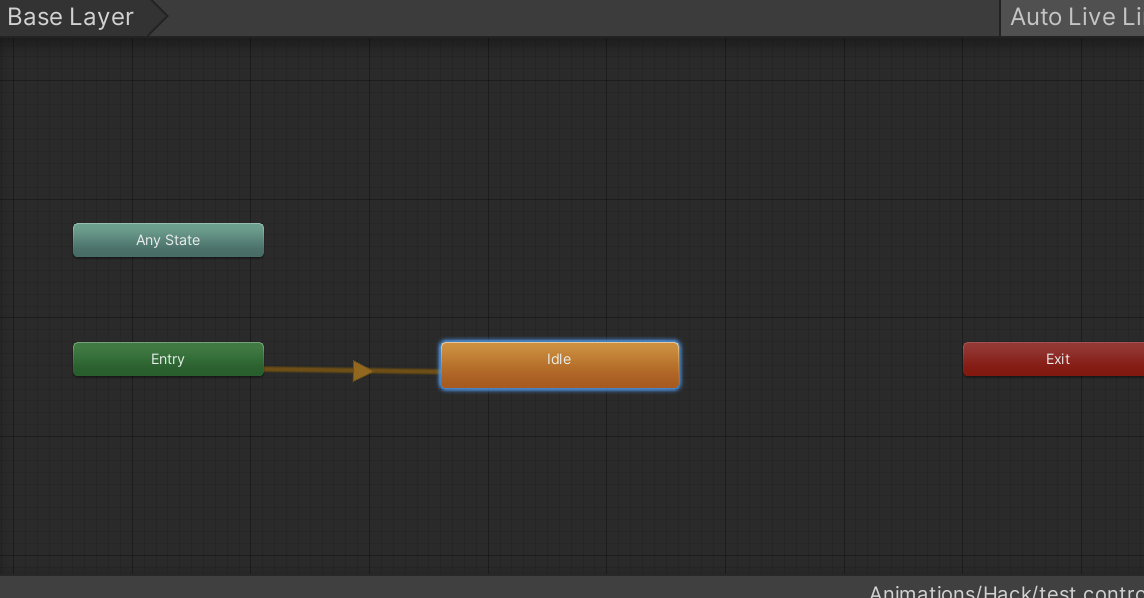
When you have all your animations set, open the AnimatorController and drag the entry animation (Idle in our case) it will automatically connect it to the entry state.
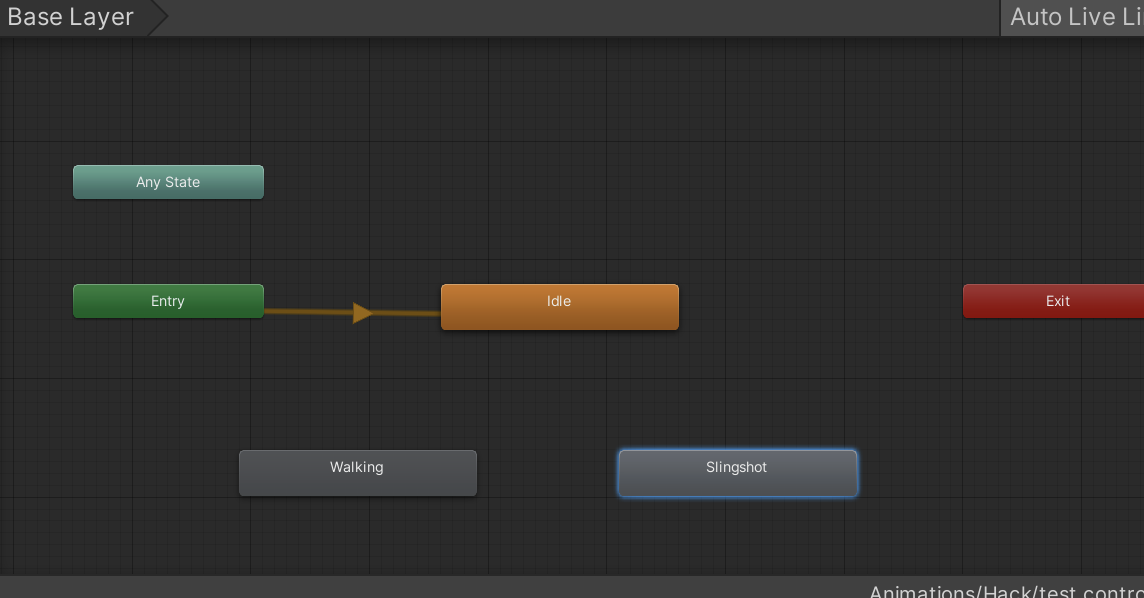
Then drag and drop the rest of the animations into the animator. Now we are ready to create the transitions 🤙.
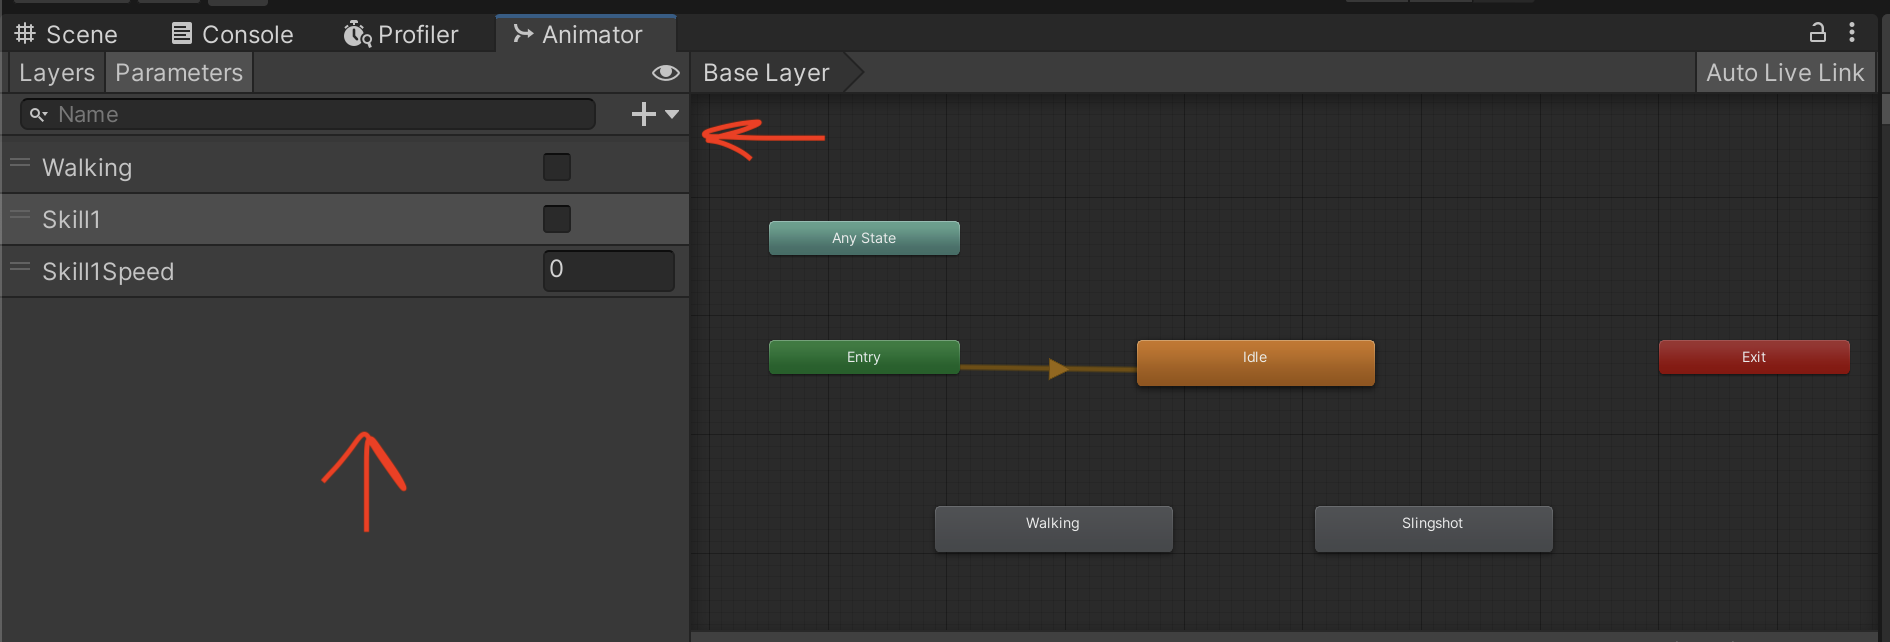
Take into account what we learned in the Parameters docs and create the respective parameters for each skill, in my case are Walking, Skill1, and Skill1Speed.
Now create the transitions between states
![]()
Select the transition, add the parameters' conditions, and tweak the transition config with what you need ( Transition duration, Has Exit Time, etc), taking into account what we learned in Transitions.
Bear in mind to tweak the values of executeAnimationDuration, startAnimationDuration, and animationSpeedMultiplier in the respective Scriptable Object of the skill.
To use the animationSpeedMultiplier, set to use the Multiplier parameter checkbox in the speed section of the animation.
How we handle projectiles
For this explanation we will be referring to 5 scripts: ProjectileInfo.cs, ProjectileHandler.cs, SkillProjectile.cs, Battle.cs and SkillInfo.cs.
Our first goal, was to create two prefabs. One for the projectile and another one for its feedback. The first issue to solve was how to associate them for future references. For example, when there are several projectiles being shot, we want to display a specific feedback for each one. For this, we needed a Scriptable Object. ProjectileInfo.cs inherits from the ScriptableObject class. In there we use CreateAssetMenu to make it easier to create custom assets using this class. We also stablished a GameObject reference: projectileFeedback.
public GameObject projectileFeedback;
This script is attached to each projectile prefab. To assign this projectile to a specific skill, we created a reference for it in SkillInfo.cs. This has all the references any skill could need.
public GameObject projectilePrefab;
ProjectileHandler.cs is attached to Battle Manager in the scene and handles the creation and instance of the projectiles. We are using MMSimpleObjectPooler to have a projectile pooler for each kind of projectile. Feel free to read the documentation on this, but we will give you a quick overview in regards of why we use this. Object Pooling is a great way to optimize your projects and lower the burden that is placed on the CPU when having to rapidly create and destroy GameObjects. With that being said, to set our pooler we use CreateProjectilesPoolers(). This requires a HashSet
SkillProjectile.cs is a component in each projectile prefab. In this script we have a reference for projectile info and methods meant for each projectile.
[SerializeField] public ProjectileInfo projectileInfo;
In Battle.cs we stablished a HashSet to populate it with all the skills that have a projectile prefab assigned.
public HashSet<SkillInfo> skillInfoSet;
In InitializeProjectiles() we wait for the players to be loaded and check for each player, all their skills and save in the HashSet only the ones with a projectile prefab assigned.
In UpdateProjectileActions(), called in Update(), if a gameProjectile status is active, we compare the skill triggered with the skills in the HashSet. This is how we determine which skill is being used and get their projectile. Once we know that, we are able to call all the methods implemented by SkillProjectile.cs such as InstanceShoot(), ShootLaser(), LaserCollision, LaserDisappear(), etc.
How to create projectiles
This will guide you step by step in the process of creating a new projectile.
First of all, you should create a projectile prefab. The vital thing is to add a SkillProjectile.cs component to it. For visual purposes, we recommend the prefab has a projectile and a trail. Keep in mind that, if you choose to follow our recommendation, these GameObjects should be children of the prefab to which SkillProjectile.cs was applied to. Then, place the prefab in the Prefab > Projectiles folder.
In the ScriptableObjects > Projectiles folder, create a scriptable object by selecting Projectile Info. You have to assign your projectile's feedback to it's reference.
Now that we have a scriptable object with the information required by our projectile prefab, we should attach one to the other. You should assign this scriptable object to its reference in SkillProjectile.cs within the projectile prefab.
At this point, our projectile should be good to go. The only step left is to assign our projectile to the skill desired. Each SkillInfo.cs has a reference for a projectilePrefab. Therefore, in the sibling folder, ScriptableObjects > Skills choose which skill, within each character, you would like to assign a projectile to and click on it. Once you do that, drag your projectile scriptable object to the Projectile Prefab input in that skill.
On the other hand, game.rs sets each projectile behaviour. In that file, you should set the projectile's behaviour and to which skill it belongs to.
How we handle feedbacks in the client side
Things to have in mind before learning how to implement new states feedback
Feedback prefabs
Unity GameObject prefabs with a particle system component to show the particles effect of the state to display. You can find them in Client/Assets/Prefabs/Feedbacks/States
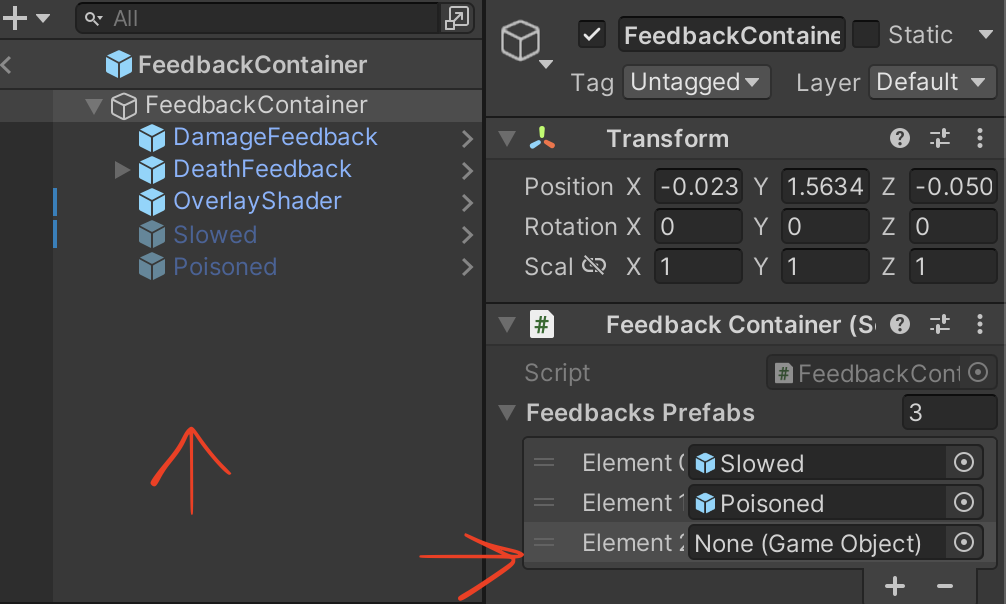
FeedbackContainer
You can find this prefab inside each character prefab; it contains a script with the same name with a list of the Feedback Prefabs to activate. You have to set each prefab in the unity editor to the list. The methods we have here are:
-
SetActiveFeedback(string name, bool activate)Activate or deactivate the feedback that matches the name parameter depending on the boolean activate -
GetFeedbackList()Return the feedback prefabs list.
PlayerFeedbacks
You can find this prefab inside the BattleManager prefab, it serves as a connection between Battle.cs and FeedbackContainer. It implements a lot of methods for the feedbacks, but the ones to handle the feedback states are:
-
SetActiveFeedback(GameObject player, string feedbackName, bool value)This is in charge of connecting theBattle.csandFeedbackContainersetting the feedback depending on the name and value. -
ClearAllFeedbacks(GameObject player)This method is really simple. It just clears all the active feedbacks, setting all thesetActiveof each feedback of the player to false.
Battle.cs
In this script we map the backend effects to the client effects. This script is huge! Fortunately, we only care about a couple of things here:
-
StateEffectsAn Enum that stores the PlayerEffect states. Why don't we use just thePlayerEffectEnum instead of thisStateEffects? Because we only care about the State effects such as Poisoned and Slowed and not the rest of the effects such as Rage, Disarm, etc. -
playerUpdate.EffectsThis is a MapField collection with the effects from the backend. We care about the keys to compare them with ourStateEffectsEnum. -
bool PlayerIsAlive(Player playerUpdate)This method is pretty simple. Returns if the player is alive or not. We want to know it to display the effects only on alive players. -
void ManageFeedbacks(GameObject player, Player playerUpdate)This method is where we combine everything we've talked about so far. Activates the feedback's effects depending on theplayerUpdates.Effectsand callsPlayerFeedbacks>().SetActiveFeedbackto activate or deactivate the feedback. Also, it clears all active effectsif(playerUpdates.Effects.Keys.Count == 0)In a nutshell, this method controls the complete flow of the feedback states.
Check out this flowchart for a better understanding of the flow.
Simplified example

How to create a new feedback for State Effects
☝️🤓 Assuming we already have the feedback implemented in the backend
-
First, create the new Feedback prefab with the particle system you want, then add it to the
Client/Assets/Feedbacks/Statesfolder. -
Inside the
FeedbackContainerprefab you have to add the new prefab as a child and then add it to the list in the script component.
- In the
Battle.csscript there is an Enum calledStateEffectswhich only contains the states effects from the backend (Because we don't want the others effects such as rage, disarm, etc), you have to add the effect you want to display and match it with thePlayerEffectenum that comes from the backend.
    private enum StateEffects
    {
        Poisoned = PlayerEffect.Poisoned,
        Slowed = PlayerEffect.Slowed,
        Freeze = PlayerEffect.Freeze, // New effect added, with the same value as the backend version
    }
We store only these states to simplify the search iterations in the ManageFeedbacks method.
- And now you are ready to go! Test it and enjoy the new feedback.🤩
How to create new character
Import the character assets to the project
We have all the assets stored in a Drive folder that contains the assets for all characters. Within each character's folder, you will find the assets available for import in the Game Ready folder.
- Add the textures (.jpg, .png) to
client/Assets/Textures/Characters/{new_character_name}folder. - Add the model (.fbx) to the
client/Assets/Models/Characters/{new_character_name}folder. - Add the animations to
client/Assets/Animations/{new_character_name}, each animation may come as an animation clip (.anim) file, or inside a model (.fbx). If that is the case, then you must import those files to Unity, and one by one expand the contents, select the animation clip from them, and copy then paste it in the previously created animations folder.- Rename the animations so it is clear which action the animation represents. The image below shows a model with the Ultimate ability animation clip inside ("Take 001").

- Follow the asset naming convention: AN_CharName_Action
- In the image case, that animation would be AN_H4ck_Ulti
- Rename the animations so it is clear which action the animation represents. The image below shows a model with the Ultimate ability animation clip inside ("Take 001").
Use the imported assets
Using the textures
- Create the character materials inside
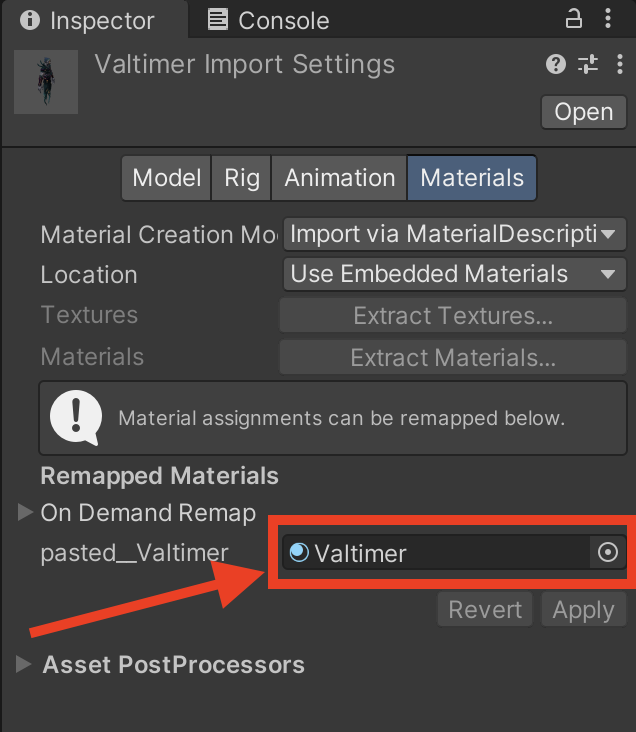
client/Assets/Materials/Characters/{new_character_name}. - We need one material per desired shader. We currently use 3 shaders per character:
- CharacterGeneric -> (in-game model)
- TransparentCharacter -> (transparent model, like inside bush)
- Universal Render Pipeline/Lit -> (UI model)
- For each material, in the inspector, assign the textures as:
- BaseColor/BaseMap for MainTexture/Base Map
- Normal for NormalTexture/Normal Map
- MaskMap for MetalicTexture/Metalic Map
- Emissive for EmissionTexture/Emission Map
Note that some characters doesn't have metalic and/or emission maps, leave them blank.
Using the models
- Inside the created models folder (
client/Assets/Models/Characters/{new_character_name}), select the model, then in the inspector tab, inside theMaterialssection, set the created material to the field inside.- Note that we created 3 materials, just assign one of them, we will override them later in the prefabs.
- This field may reference the name of the character or have a "txt" or "material" inside it's name, there probably won't be more fields to set, so it should be easy to find (see the image below).
- Maybe you'll have to adjust the
Scale Factorsetting of the model, but don't do that yet, we'll go through this on the character prefab section of this doc.
Using the animations
- Inside
client/Assets/Animations/{new_character_name}set as "loop" animations the ones we need, this is done in the inspector checking theLoopTimecheckbox.- Currently they are: victory, defeat, idle and run/walk.
- In the same folder, create the needed Animator Controller's for the respective character. We usually create two separate controllers, one for UI and another one for in-game actions.
- Name them AC_CharName_UI and AC_CharName.
- Each of these controllers will hold a state representative of each animation the character will make, they are created by drag and dropping the animation clips inside the animator window with the controller selected, then we have to create the transitions between them.
- To create the transitions, you have to right-click any animation then "create transition" and point it to whatever state you want to transition to.

- Every transition must have either
Has Exit Timechecked or a condition added to its list (e.g. victory=true). 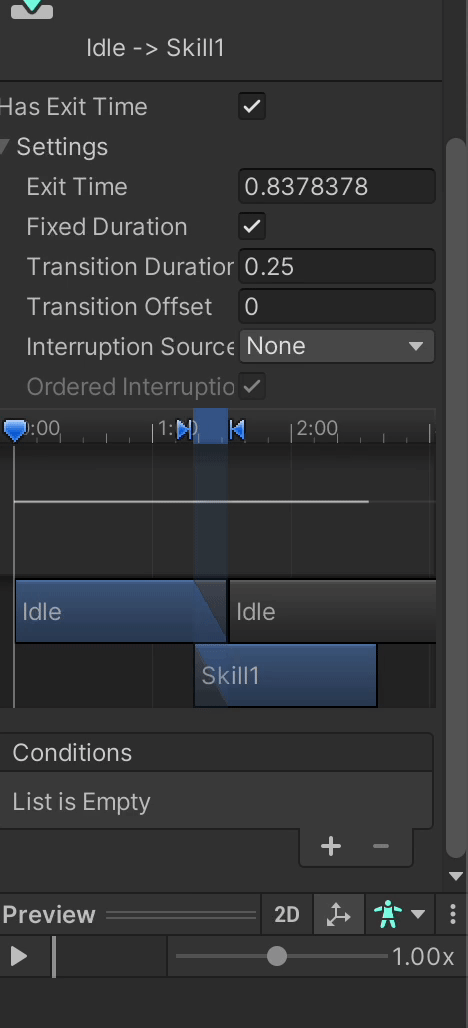
- In general, we set a condition for "in" conditions, that is from state A to state B. For "out" conditions (returning from state B to state A), just set an exit time.
- For most transitions we set the
Transition Durationto 0.2 seconds, but this is just a general rule, for correct implementation each transition must be analyzed separately.
- You also have to create parameters for each controller:
- UI controller:
- Victory (bool)
- Defeat (bool)
- BASIC (bool)
- DASH (bool)
- ULTIMATE (bool)
- in-game controller:
- Walking (bool)
- Skill1 (bool)
- Skill2 (bool)
- Skill3 (bool)
- UI controller:
- Those parameters will be used in the conditions. For example, you want to go from
IdletoBasicSkillwhen bothwalking=falseandskill1=true.- Check other character controllers for reference.
Creating the Character's prefabs
In-game character prefab
-
To create the character's prefab it's best to duplicate one from an already existing character and change the components and references for the new one. They are located in
client/Assets/Prefabs/Characters/. -
With this prefab opened (hierarchy tab), place the model we imported and tuned before inside
CharacterModelAnchor(be careful some characters are outdated like H4ck and doesn't have this kind of structure). -
Then, with both the model you just added and the one from the copy-pasted model, you can go to "Scene" tab to tune the size of the new model, using the copied model as reference.
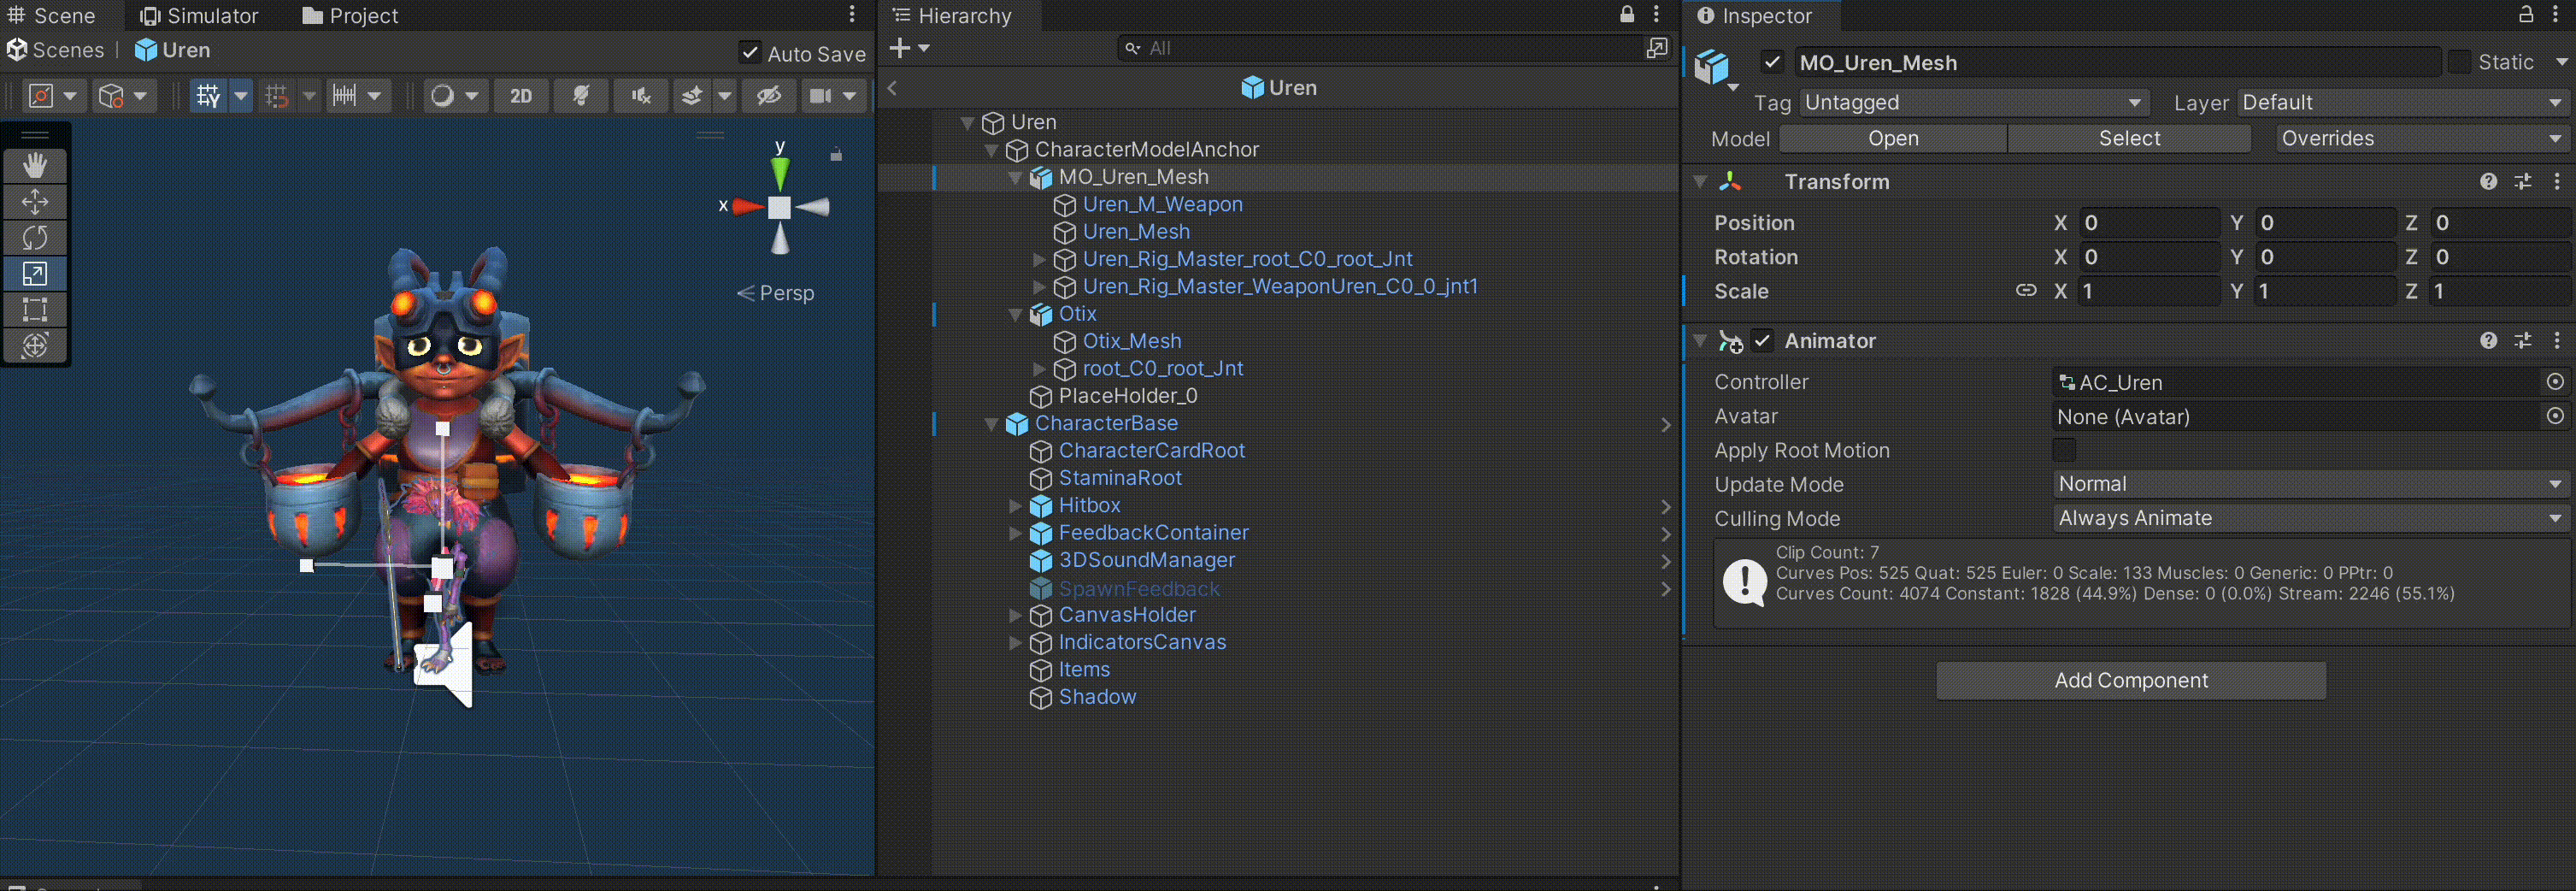
- Here you'll have to adjust the
Scale Factorof the model (we talked about this before) and/or theScaleof the transform component of the model inside the prefab. - After both sizes match (doesn't matter if one is shorter and other is taller, both must match), remember to remove the duplicated model from the prefab.
-
Replace the Model's Material if needed (remember we have 3 materials and we have to select the UI or CharacterGeneric one), we must use the CharacterGeneric one here.
-
In the model object of the character's prefab, you must:
- Create an animator component.
- Reference the animator controller we created before.
-
In the prefab's root (not in the model), in the
Custom Characterscript component, under theCharacter Animatorattribute, reference the animator we just created in the model. -
Inside the
CharacterBaseobject of the prefab, you'll have to set theSkinnedMeshRendererof the Character Feedback Manager component to the body mesh of the characters model.- To set them, you have to drag and drop the proper mesh game objects from the model to the
CharacterBaseGO. 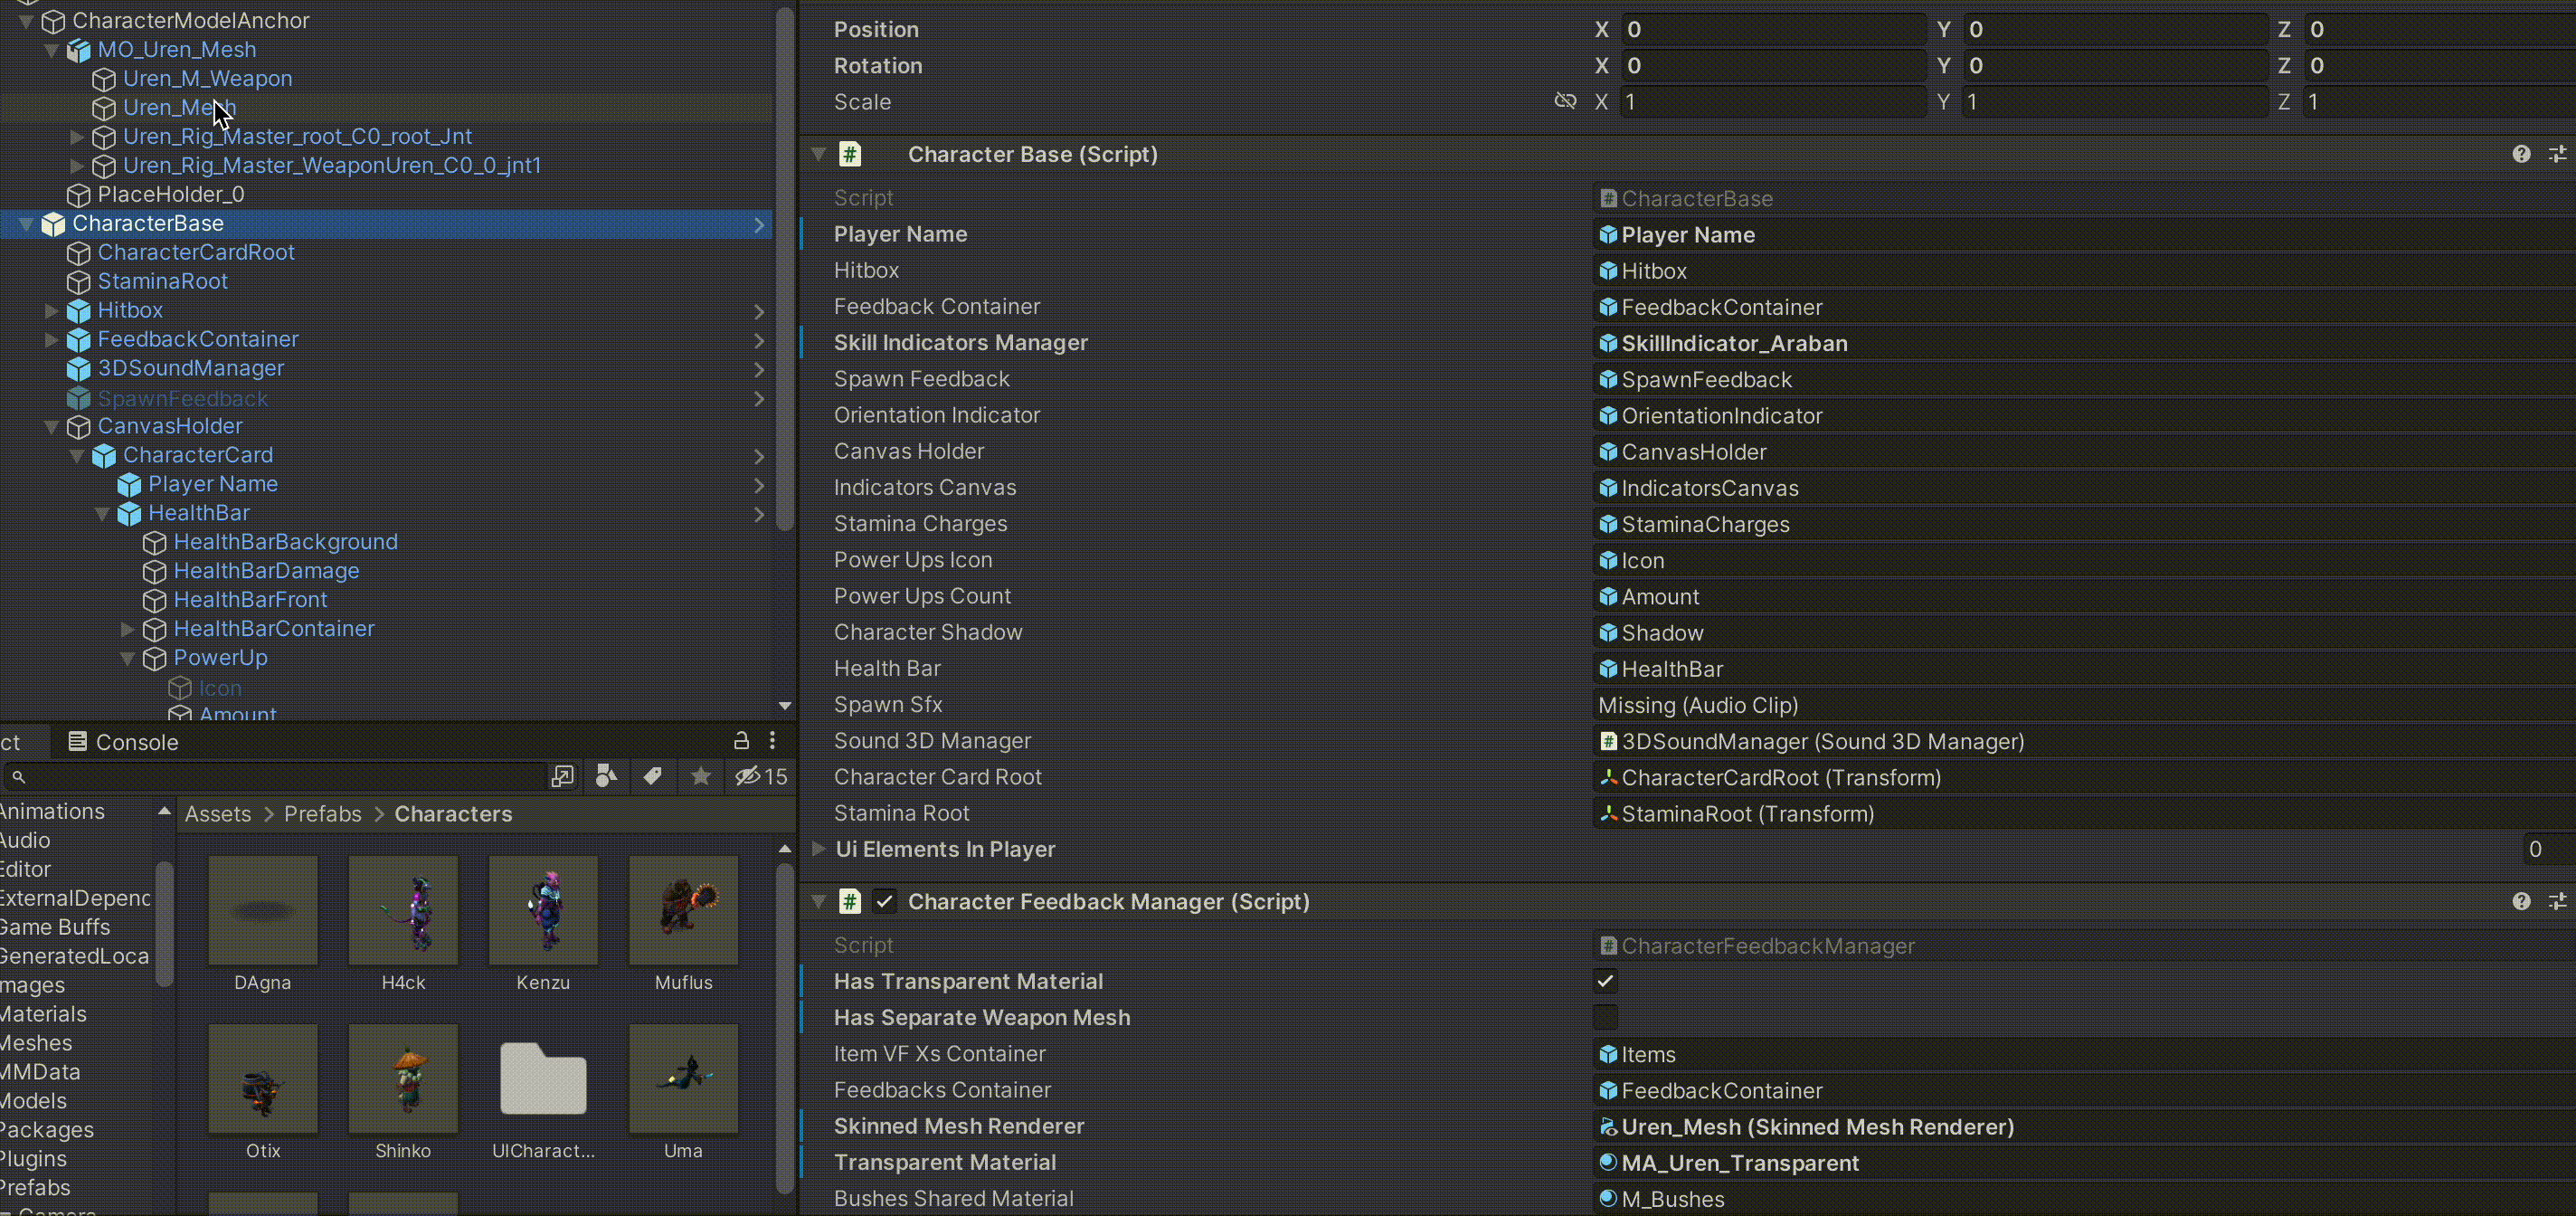
- To set them, you have to drag and drop the proper mesh game objects from the model to the

As you'll probably have seen inside the parent object of the prefab and the CharacterBase object, there are multiple components with many attributes that can be set, you must replace all the references to the previous character with the references to the new character.
Note: some references are not needed for certain characters. For example, some characters have 2 mesh, one for the weapon and another one for the character, set them properly as needed.
UI character prefab
You can:
- copy and paste an existing characterUI
- copy the model from the character prefab you created, paste it inside the characterUI prefab.
- Replace animator controller in model. Use the UI variation instead of the normal one.
- Replace the Material in character and weapon mesh's. Use the UI variation instead of characterGeneric.
Creating character and skills scriptable objects
Inside client/Assets/ScriptableObjects/Characters you'll find the scriptable objects for every character, maybe there is even one for the character you are trying to implement now. If not, create it (Create > CoM Character).
Now you must assign the correct values for the respective fields:
- For the
Skills Infoarray you must create scriptable objects insideclient/Assets/ScriptableObjects/Skills/{new_character_name}(Create > CoM Skill). - Both the skill's and the character's scriptable object itself have many fields that must be set respective to the character's features and characteristics.
After the previous steps are complete you must go to the TitleScreen scene and add the newly implemented character's scriptable object to the All Characters collection inside CharactersManager.
Also, if you want to add the character as a selectable character in game, you have to add its name inside the script CharactersManager.cs code, in the availableCharacterNames list field.
With all this done the only thing left to do is check if the character is available and playable, and the editor doesn't show any warning or error.
Tips
- It's a good idea to lean on already implemented characters when getting stuck, to copy the structure they follow.
How to add documentation
Install mdbook
☝️🤓 First make sure you have installed mdbook in your machine. Run mdbook -V. If you have it you will see something like mdbook v0.4.34 if you don't, install it with the following command lines:
cargo install mdbook
cargo install mdbook-mermaid
Now you are ready to continue, for more information check the mdbook mdbook docs.
Create a new section
If you want to add a new documentation page it is pretty simple, follow the steps bellow
Using the Command Line :
In the root of the project type:
cd docs/src
Inside the src folder create your markdown document (without curly braces).
touch {your_page_name}.md
open {your_page_name}.md
Write your document and save it. Then open SUMMARY.md document and add your new page as following:
- [Your new section name](./{your_page_name}.md)
Finally go back to the root folder cd ../.. and run make docs, now you are ready to go. Your new section had been added to the docs 🤩